
by Steve Sorbo | Feb 3, 2020 | Uncategorized
For some Mac users, macOS 10.15 Catalina is no longer a choice. That’s because the new 16-inch MacBook Pro and the 2019 Mac Pro that Apple released late last year ship with Catalina installed and can’t run any previous version of macOS.
But for most people, it’s time to consider an upgrade to Catalina. Most backup software now works with Catalina’s bifurcated drive approach that puts the system on a separate, read-only volume from your data and apps. We’ve all had several months to come to terms with the fact that old 32-bit apps won’t even launch in Catalina. And Apple has shipped several updates that bring Catalina to version 10.15.3, addressing most of the complaints users had with the initial release.
If you are ready to try Catalina but still want to use 10.14 Mojave, we have some advice for how to make that happen. This could be the case for someone who has purchased a new Mac that does support Mojave but came with Catalina installed, for someone who wants to test Catalina while still using Mojave, or for someone who wants to move on to Catalina but has a 32-bit app that they aren’t ready to say good-bye to.
Downgrade from Catalina to Mojave on Some New Macs
Apple has started installing Catalina on new Macs other than the 16-inch MacBook Pro and 2019 Mac Pro, but since these older Macs can still run Mojave, it’s possible—if a bit tricky—to downgrade them to Mojave.
System engineer Armin Briegel has worked out a way of downgrading new Macs to Mojave. First, you create a Mojave Installer USB drive. To use that drive to boot a Mac with a T2 security chip, you must allow external booting from the Security Utility on the Recovery partition. Once you’ve booted from your Mojave Installer drive, use Disk Utility to erase the entire internal drive. Then install Mojave.
Use Virtualization to Keep 32-bit Apps Running
For some people, what’s keeping them on Mojave is a single 32-bit app that will never be updated in an appropriate fashion. Quicken 2007 falls into this category, as does the ScanSnap Manager app for the ScanSnap S1300, S1500, and S1500M scanners. Sure, you can get a current version of Quicken, but it may not do precisely what you want, and Fujitsu would be happy to sell you a new ScanSnap scanner that does come with 64-bit software, but then you’ll have to figure out what to do with your old scanner.
So if you’re ready to upgrade to Catalina in general but need to maintain access to one or two apps, one solution is virtualization software: either Parallels Desktop or VMware Fusion. Both apps let you run nearly any operating system—including older versions of macOS like Mojave—in a virtual machine. In essence, they fool the guest operating system, whether it’s Mojave or Windows, into thinking it’s running normally on a computer, when it’s actually running in a virtual environment.
These apps cost about $80, and while there’s a bit of work in setting them up (the screenshot below shows the option for installing Mojave in Parallels Desktop during setup), once you have them configured, it’s easy to run older apps alongside newer ones with little or no performance hit. This approach is also perfect for a 16-inch MacBook Pro or Mac Pro that can’t run Mojave in any other way.
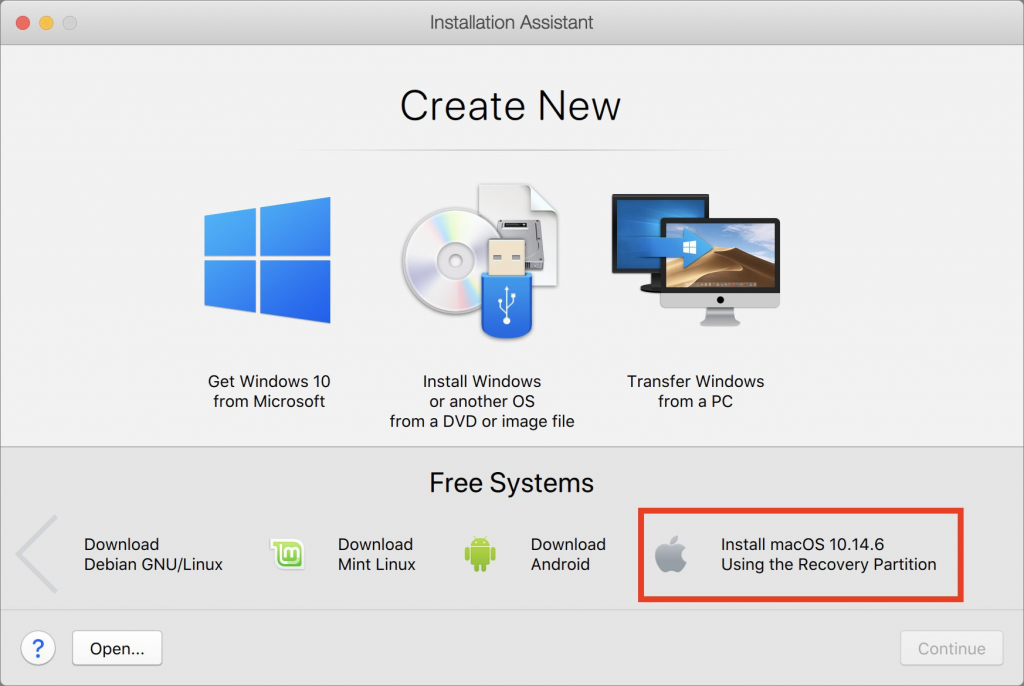
Install Catalina and Mojave on Separate APFS Volumes and Switch Boot
Finally, there’s one other option that lets you switch back and forth between Mojave and Catalina, assuming your Mac supports Mojave. You can create an APFS volume on your internal drive and install another version of macOS on that. It’s easy, and Apple provides full instructions. The only problem with this approach is that you’ll have to restart to switch operating systems, whereas both are available simultaneously with the virtualization solution.
First, make sure you have at least one current backup of your Mac, since it’s foolhardy to adjust your drive structure without one. Next, in Disk Utility, select your internal drive, choose Edit > Add APFS Volume, and click Add. We recommend naming the drive such that it will be clear what’s on it.

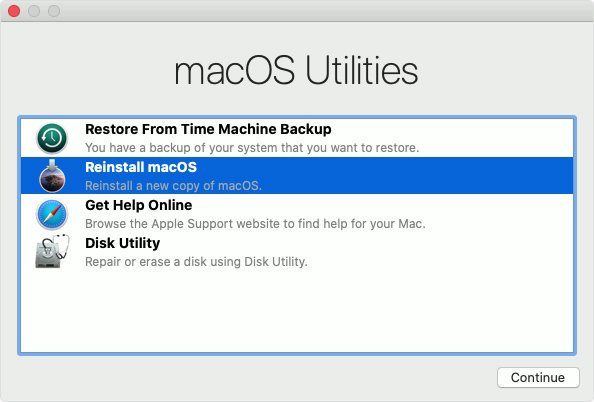
Then boot into macOS Recovery and install the desired version of macOS on your new volume. The keys you hold down to get into Recovery determine which version of macOS you’ll get:
- Command-R reinstalls the latest version of macOS that was installed on your Mac.
- Command-Option-R upgrades to the latest version of macOS that’s compatible with your Mac.
- Command-Shift-Option-R reinstalls the version of macOS that came with your Mac, or the closest version still available.
Choose Reinstall macOS from the macOS Utilities window and proceed from there.
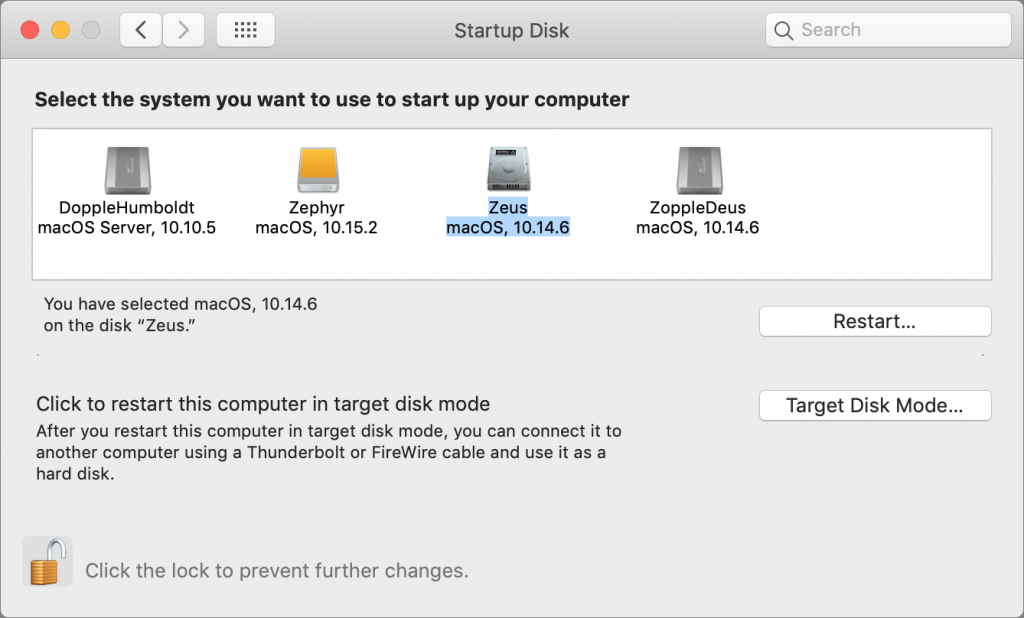
Once the installation is complete, to switch from one version of macOS to another, open System Preferences > Startup Disk, choose the desired volume to boot from, and then click Restart. Or, press Option at startup and select the desired volume from the Startup Manager screen.
Needless to say, the decision about when and how to upgrade to Catalina isn’t a trivial one, so feel free to contact us to discuss your particular situation or to get help with any of the procedures that we’ve described in this article.
(Featured image by Apple)
Social Media: Considering upgrading to Catalina? Or maybe you have a new Mac that came with it already installed? Read on for strategies for downgrading to Mojave or running both Catalina and Mojave.

by Steve Sorbo | Feb 3, 2020 | Uncategorized
Spearfishing. It’s no longer just a tropical ocean sport that could provide seafood for dinner. In today’s tech world, spearfishing is when someone targets you specifically, usually with the goal of taking over your online accounts. Once that’s done, the attacker will try to siphon money from your bank account, impersonate you in an attempt to deceive family or colleagues into sending money, or attempt to ruin your reputation.
You’re probably thinking, “No one would ever target me. I’m not interesting enough.” It is true that the people who should worry the most about spearfishing attacks are high profile or have a high net worth, but modern online criminals aren’t that fussy. In particular, they’re more likely to go after older people. Why older people? Older people tend to be relatively well off and less likely to notice the symptoms of a spearfishing attempt. You should also be concerned if you’re a politician or journalist, have ever been involved in an ugly divorce or legal battle, or can easily think of people who have it in for you.
As we’ve said many times, it’s imperative that you use a secure password manager like 1Password or LastPass to create, store, and enter a strong, unique password for each of your online accounts. Plus, we strongly recommend using two-factor authentication—where you have to enter a one-time code in addition to your password—on all accounts that support it, particularly important ones like your email and banking accounts. But even if you do all that, you may be vulnerable to another tactic favored by spearfishers—the cell phone SIM takeover.
Here’s how it works. Every cell phone, including every iPhone, has inside it a SIM card that gives it a phone number. Swap that SIM into a different phone and it will adopt the SIM card’s number. The problem is that support reps at cellular carriers like AT&T, Sprint, T-Mobile, and Verizon can also move your phone number from one SIM card to another. That makes it possible for you to lose your iPhone, buy a new one, and have your phone number associated with the new one. It also lets you port the phone number to a different carrier, if you wish to switch.
All an attacker has to do is call your cellular provider, pretend to be you, say that they’ve lost their iPhone, and ask to have the number ported to a new device (one they control). It’s likely that the support person will ask a few simple questions to verify your identity, but a clever attacker will likely know your address and be able to learn details like your mother’s maiden name, first-grade teacher’s name, and favorite color, all thanks to Facebook. Criminals can acquire even information like your Social Security number through other data breaches.
Once the attacker controls your cell phone number, they can try to reset the password on various accounts, receiving any verification codes that would normally have been texted to your phone. They’ll probably focus on your email account first because, with control over it, they can reset passwords elsewhere even more easily. And once the attacker has access to your accounts, it’s game over, and you’ll be faced with the difficult and complex task of retaking control and mitigating damage.
How can you protect yourself from such an attack? Whenever possible, it’s better to generate authentication codes with an app such as 1Password, Authy, or LastPass. That removes some of your exposure, but for better or worse, your cell phone number is still the most basic form of identity for many things.
The most important thing to do, then, is to set up an additional PIN or passcode that the carrier will ask for before making any changes to your account. You’ll also have to provide it when logging in to your cellular account online. Such a PIN or passcode is different from a two-factor authentication code that changes continuously—you set your PIN or passcode just like you do for your iPhone or ATM card. And, of course, make sure to store that PIN or passcode in your password manager alongside your other credentials so you don’t forget it.
Learn more about how each of the major carriers supports PINs and passcodes at the links below, and if your carrier isn’t listed, call the company’s support line:
Don’t put this off—if you don’t already have a PIN or passcode on your cellular account, set it up right away.
(Featured image by Gerd Altmann from Pixabay)
Social Media: It’s shockingly easy for someone to take over your cell phone number. Once they’ve done that, they can reset passwords on many of your online accounts. Read on to learn how to protect your cell number with a PIN or passcode.

by Steve Sorbo | Feb 3, 2020 | Uncategorized
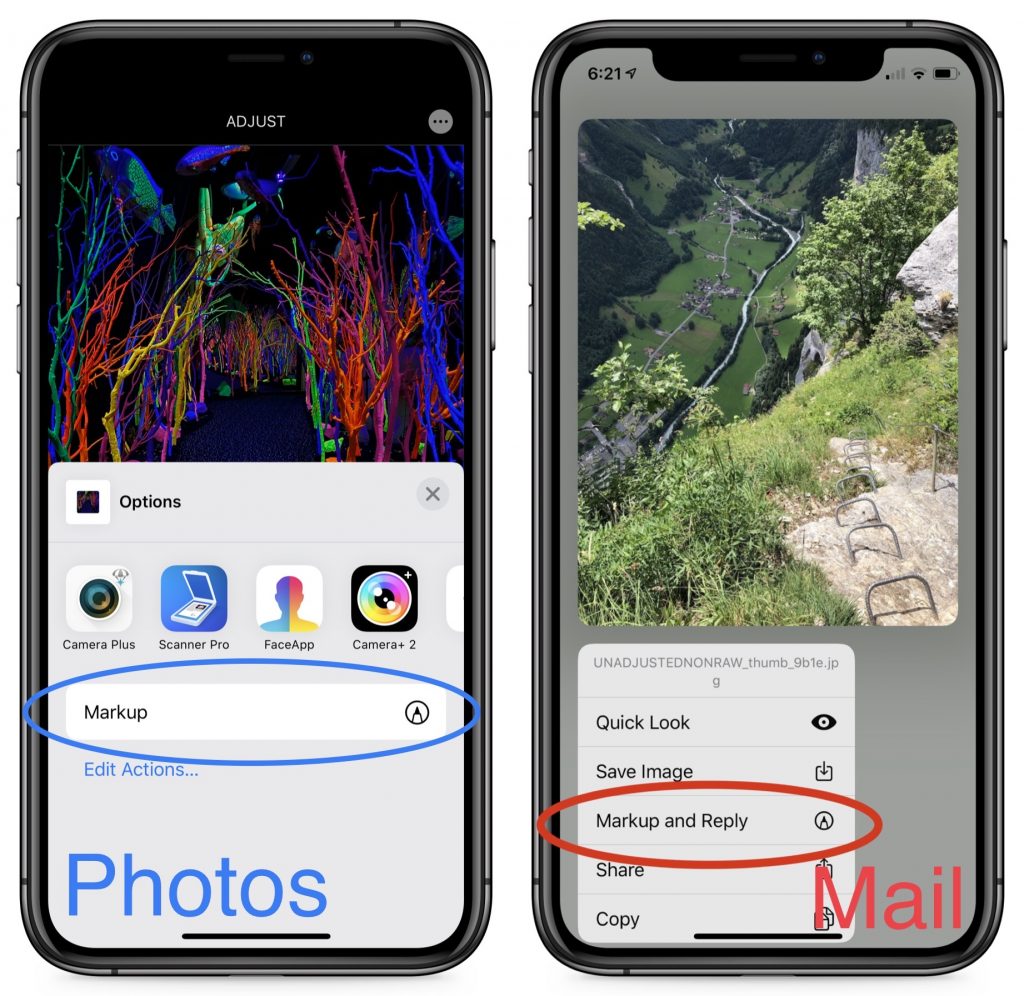
Ever wanted to take a photo of a receipt and circle the item for which you should be reimbursed? Or perhaps you’d like to put some text or a speech balloon on a photo? You can do all that and much more using iOS 13’s Markup tools. They’re available when you take a screenshot, in Files and Photos, and even for image and PDF attachments in Mail. Here’s what you can do.
Accessing iOS 13’s Markup Tools
How you invoke the Markup tools varies a bit by app. Here are some common techniques:
- After you take a screenshot, tap its thumbnail preview.
- In Files, tap an image file or PDF to view it, and then tap the Markup
 button in the upper-right corner.
- In Photos, tap Edit to start editing a photo, tap the More
 button in the upper-right corner, and then tap Markup in the activity view that appears.
- In Mail, press and hold an image in an email message until an activity view appears, and then tap Markup and Reply.
In other apps, look for the Markup button or an activity view that might have a Markup option on it.
Using the Markup Tools
The iOS Markup tools are surprisingly powerful, so much so that you might find them just as capable as a basic graphics app on the Mac. Before we get into the details, however, note the buttons at the top of the screen. Exactly what you’ll see depends on context, but you can learn the basics from this rundown of the buttons in Photos.

Tapping Cancel throws away all your changes and exits Markup. Tapping Done saves your changes and exits. Tapping Undo (the left-pointing arrow) undoes the last action, and Redo (the right-pointing arrow) redoes what you undid.
Drawing Tools
When you first enter Markup, it presents you with the drawing tools at the bottom of the screen, with the Add Annotations button at the right. The tools include:
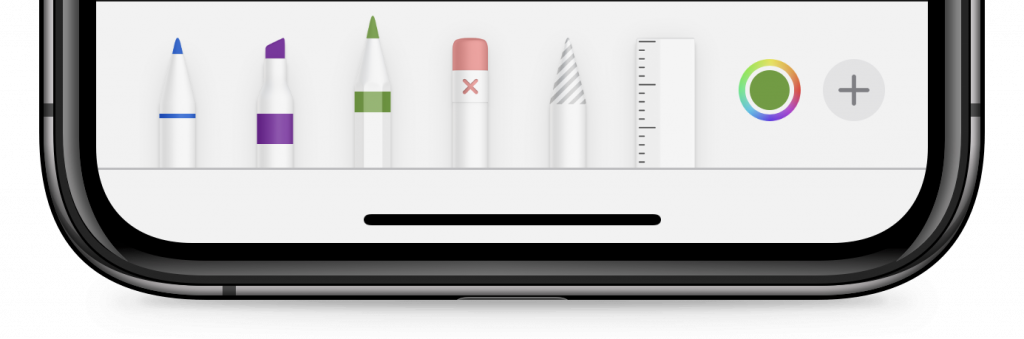
- Pen, Marker, and Pencil: The first three tools simulate their real-world counterparts. Tap the selected tool to change the line thickness or opacity.
- Object Eraser: When this tool is selected, a tap on something you’ve drawn erases it. You can also tap Undo to erase the last-drawn bit or to reverse the last erasure. When this tool is selected, tap it again to switch it to a Pixel Eraser, which works like a traditional pencil eraser on what you’ve drawn.
- Lasso: Tap this tool and then drag out a selection to select something you’ve drawn. Once you’ve selected an object, drag to move it. You can also change the color of a selected object.
- Ruler: Frustrated by your inability to draw a straight line? Tap the ruler to display it, use one finger to move it, and one finger on each end to rotate it. Once it’s positioned, draw along either edge to get a straight line.
- Color: Tap the Color button to choose a color for the currently active pen, marker, or pencil.
Annotation Tools
To access the rest of the Markup tools, tap the Add Annotations button at the right. It displays a popover with four or five options: Text, Signature, Magnifier, a set of shapes, and sometimes Opacity.
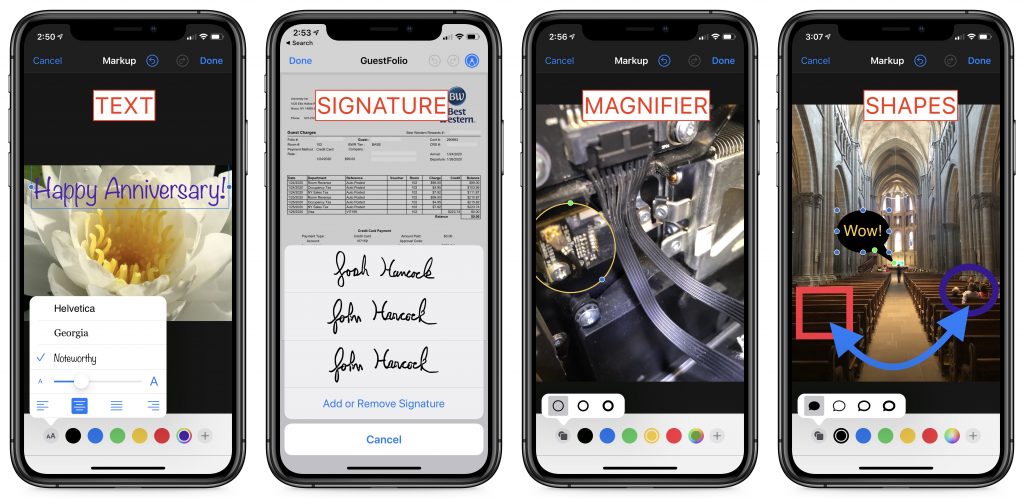
- Text: Tapping Text in the popover inserts a text box on the image. Tap it to select it, after which you can drag it around, resize it by dragging its blue handles, or change its color by tapping a color button at the bottom. You can also or change its font, size, and justification via the Attributes button at the left of the toolbar.
- Signature: The Signature option gives you a menu of any signatures that you’ve added in Preview on the Mac, or it lets you add or remove a new one. Tap any signature to insert it. This feature is most useful when signing PDFs.
- Magnifier: Much like the Loupe in Preview on the Mac, a magnifier zooms a small, circular portion of the image. When a magnifier is selected, you resize it by dragging the blue handle and adjust the zoom level by dragging the green handle.
- Shapes: Tap one of four shapes to insert a rectangle, oval, speech balloon, or line. Once it’s inserted, you can drag it around, resize it with a blue handle, or adjust line curvature and speech balloons in other ways with a green handle. Tap the Attributes button at the left of the toolbar to change the object’s fill, line thickness, and arrow styles. You can also tap a color button to change the current object’s color.
- Opacity: This option appears for screenshots, but not for most other images. It provides a single slider that lets you adjust how transparent the image is, which might be useful when layering text or graphics on top of it.
Apple has packed an impressive level of functionality into iOS 13’s Markup tools. While they’re easy to use, it’s worth playing with them with some throwaway images so you know what you can do when it comes time to mark up a receipt or sign a PDF.
(Featured image by Marek Levak from Pexels)
Social Media: Ever needed to circle an item on an expense receipt, add some text to a photo, or sign a PDF…on your iPhone or iPad? iOS 13’s Markup tools are surprisingly capable—learn more about what they can do here:
by Steve Sorbo | Feb 3, 2020 | Uncategorized
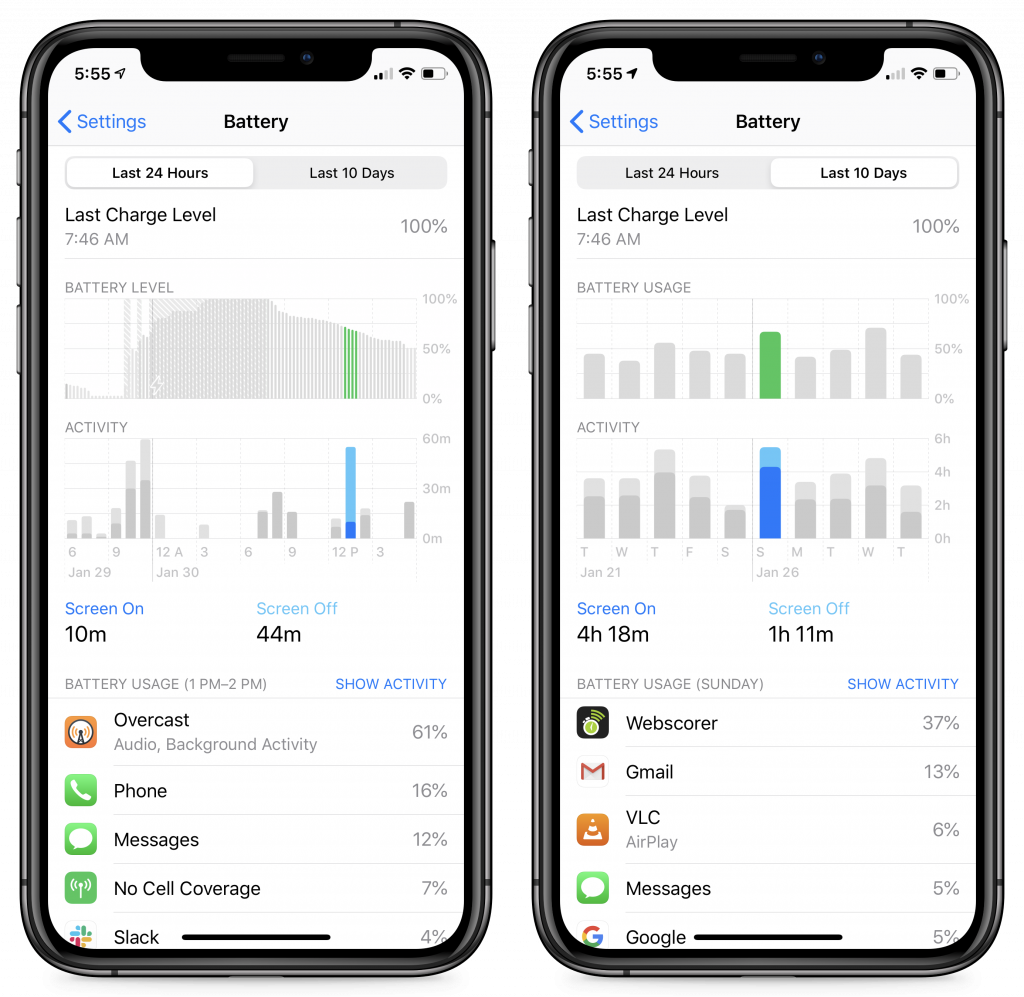
A common question we hear is, “Why is my iPhone/iPad battery draining so fast?” Luckily, Apple provides tools that help you see exactly how your iPhone uses its battery over the last 24 hours and—with less detail—over each of the last 10 days. Plus, you can tweak settings that will improve battery life, both in the here-and-now and for as long as you have your iPhone. To access these tools, go to Settings > Battery.
Useful Battery-Related Options
Before we get into what you can learn from the Battery screen, there are two options worth noting:
- First, on the main screen, you’ll find the Low Power Mode switch. If you’re worried about running out of power before you can recharge on a particular day, enable Low Power Mode. iOS automatically offers to enable it if your battery drops to 20%, and that’s a good idea unless you can plug in soon. Low Power Mode mostly disables background activity like mail fetching and photo syncing. (If you want to enable Low Power Mode regularly, make that easy by adding it to Control Center via Settings > Control Center > Customize Controls.)
- Second, tap Battery Health, and in that screen, enable Optimized Battery Charging. It lets iOS 13 learn from your schedule to ensure that your iPhone spends less time fully charged unnecessarily, which can cause the battery to age more quickly. Leave this option off if you don’t charge on a regular schedule.

About That Maximum Capacity Percentage
Whenever we hear complaints about iPhone batteries, the first place we look is in the Battery Health screen to make sure the battery is healthy. Apple says that iPhone batteries are designed to retain up to 80% of its original capacity after 500 charges. The higher the Maximum Capacity number, the better. Usually, anything above 90% is OK, although we start to hear of problems when the Maximum Capacity is in the upper 80s, and numbers below 85% are fairly likely to cause problems. The only solution to a battery with a low Maximum Capacity is replacement; contact us for our advice on the best way to do that.
Identifying Battery Hogs
Assuming the battery’s Maximum Capacity is high enough, the next place to look for what might be causing excessive battery drain is in the Battery Usage By App section of the Battery screen; look below the graphs, and tap Show Activity for more details.
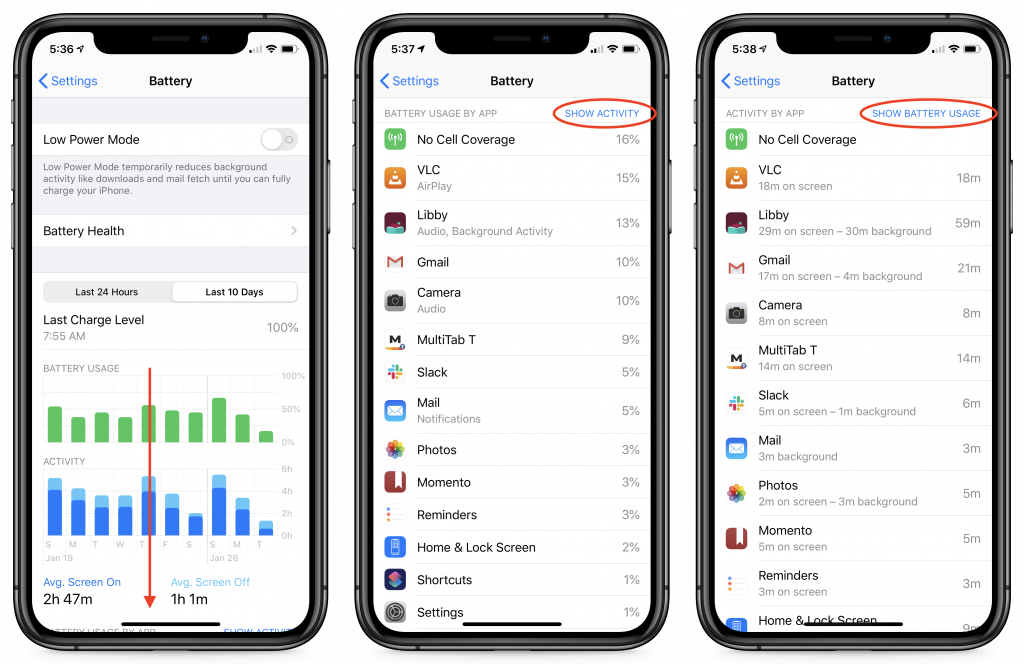
Scrutinize the entries at the top because they’ve used the lion’s share of your power. In the screenshot above, No Cell Coverage (which causes the iPhone to waste power searching for cell towers) was the worst offender. You can’t do anything about that (unless it’s indicative of putting the iPhone somewhere it can’t receive a signal or a failing cellular radio).
For the apps underneath, make sure they’re not working too much in the background unnecessarily. “Unnecessarily” is key—if you see Photos at the top of your list and Show Activity reveals a lot of background activity, it’s probably related to it uploading or downloading a lot of images from iCloud Photos. But if you can’t imagine why a particular app is sucking down precious power, it’s time to force quit the app or power cycle the iPhone. And if the problem continues, it might be time to reset the iPhone and restore from backup, just to clean things up.
Analyzing Battery Usage
For figuring out which app might be causing unusual battery drain, it’s usually best to keep the time frame in the Last 24 Hours, but if you’re trying to track down a pattern of app behavior, it can be useful to switch to the Last 10 Days using the toggle above the graphs.
Most people don’t realize these graphs aren’t just pretty pictures. You can tap in the graphs to select 1-hour chunks of time in the Last 24 Hours graphs, or 1-day chunks in the Last 10 Days graphs. When you do that, the Battery Usage By App list changes to focus on just the apps used in the selected time period. That’s helpful for tracking down exactly what was happening when the battery drain took place.
We’d like to say that you can use these tools to figure out nearly anything that’s causing your battery to drop precipitously, but there are issues that the Battery screen doesn’t expose. For instance, after you upgrade to a new version of iOS or switch to a new iPhone, background tasks will likely work hard for a while indexing all the content on the device. Most issues like that should go away quickly, though.
Regardless, it’s worth looking in the Battery screen whenever you feel that your battery life isn’t what it should be. Whether it’s a rogue app or the revelation that you need a new battery, it will provide some guidance. And if you’re still in the dark, let us know, and we’ll see what we can do to help.
(Featured image by Tyler Lastovich from Pexels)
Social Media: Is your iPhone battery draining faster than you think it should? iOS 13’s Battery screen can shed light on the situation, whether it’s a dying battery or a rogue app. Learn more here:

by Steve Sorbo | Jun 5, 2019 | Uncategorized
At Apple’s Worldwide Developer Conference on June 3rd, the company unveiled the next versions of all its operating systems—macOS 10.15 Catalina, iOS 13 (and a new iPadOS), watchOS 6, and tvOS 13–along with the much-anticipated new Mac Pro and Pro Display XDR.
Nothing that was announced will ship until later this year—probably September—but we wanted to give you a quick overview of what’s coming down the pike.
macOS 10.15 Catalina
With macOS 10.15, which Apple is calling “Catalina,” the company is working to bring macOS and iOS ever closer while preserving what makes the Mac special.
For instance, Catalina replaces the increasingly overloaded iTunes with three new apps that mimic those in iOS: Music, Apple Podcasts, and Apple TV. Reminders, Notes, and Photos also see significant enhancements that are mirrored on the iOS side, and a new Find My app on both platforms combines the capabilities of Find My iPhone and Find My Friends. Apple is even bringing Screen Time from iOS to the Mac to help you track and control your usage—and that of your kids—across all your Apple devices.

Some of these apps exist on the Mac thanks to Project Catalyst, an Apple technology that makes it easy for developers to convert iOS apps to the Mac. Apple used Catalyst internally last year to bring Home, News, Stocks, and Voice Memos to macOS 10.14 Mojave. This year, Apple is letting third-party developers use Catalyst, so once Catalina ships, we’ll see a flowering of new Mac apps coming over from iOS.
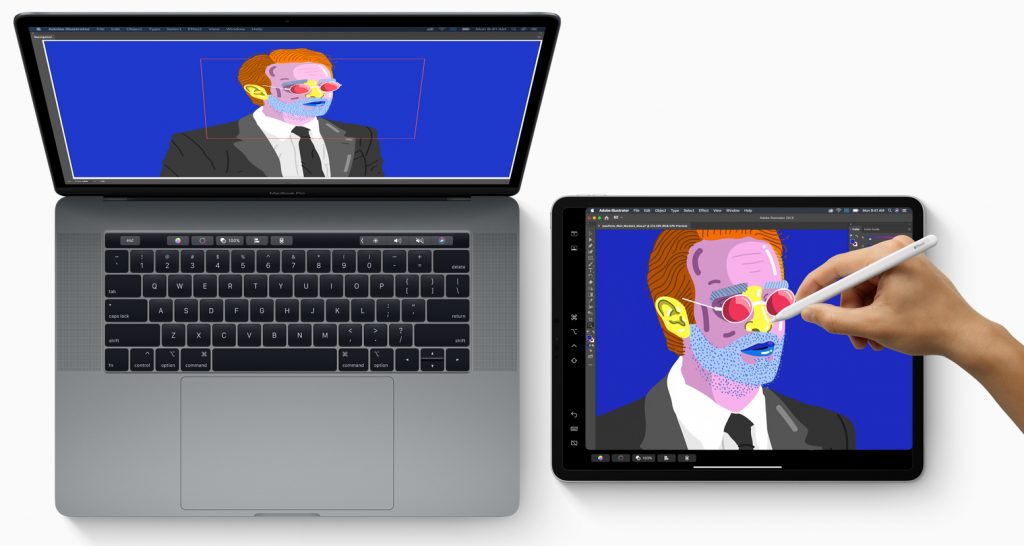
Another new technology, Sidecar, lets you use an iPad as a second screen for a Mac, either wired or wirelessly. Sidecar even enables you to use the iPad and Apple Pencil as a graphics tablet with apps that support such an input method. Two other new features will let you use a Sidecar-connected iPad to mark up any PDF or insert a sketch into a Mac document.
Catalina promises many more features, including some that will increase macOS security and others that will make the Mac much easier to use for people with disabilities. For instance, the new Voice Control capability lets you run a Mac (or an iOS device) entirely with your voice—it’s amazing.
If you’re running Mojave now, you’ll be able to run Catalina too since the system requirements remain the same.
iOS 13
With iOS 13, Apple appears to be focusing once again on performance and refinements. The company claimed we’ll see faster Face ID recognition, smaller app downloads and updates, and quicker app launches.
The most apparent new feature will be Dark Mode, which Apple is bringing over from Mojave. It displays light text on a dark background, which can be welcome when using an iOS device in a dark room without bothering others. It also may increase battery life on OLED-based iPhones like the iPhone X, XS, and XS Max. But keep in mind that research shows the human eye and brain prefer dark text on light backgrounds, so you may read more slowly and with less recall in Dark Mode.
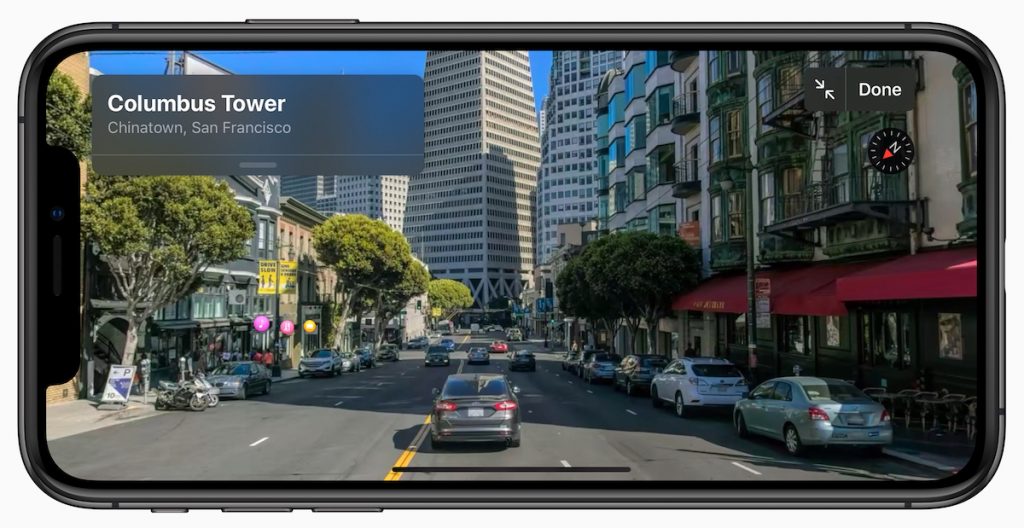
Along with the apps mentioned previously that also improve in iOS, Apple said it has rebuilt Maps and its underlying database from the ground up, so you’ll see far more detailed maps, and you can zoom in for a street-level photographic view called Look Around.
Camera and Photos received attention as well, giving you faster access to effects and letting you apply effects to videos as well. You can even crop and rotate videos taken in the wrong orientation—finally!
Other improvements include a new Sign In with Apple option for signing in to apps using your Apple ID, full text formatting in Mail, shared folders in Notes, SMB sharing in Files, iCloud Drive folder sharing, and support for USB thumb drives.
In terms of system requirements, iOS 13 drops support for some older devices, leaving the iPhone 6s, 6s Plus, and SE as the oldest iPhones supported, along with just the newest iPod touch.
iPadOS
Joining Apple’s other operating systems this year is iPadOS, a superset of iOS 13 that provides additional iPad-only features. In some ways, it’s nothing new, since the iPad has always had unique features, but it shows how Apple wants to differentiate the iPad from the iPhone.
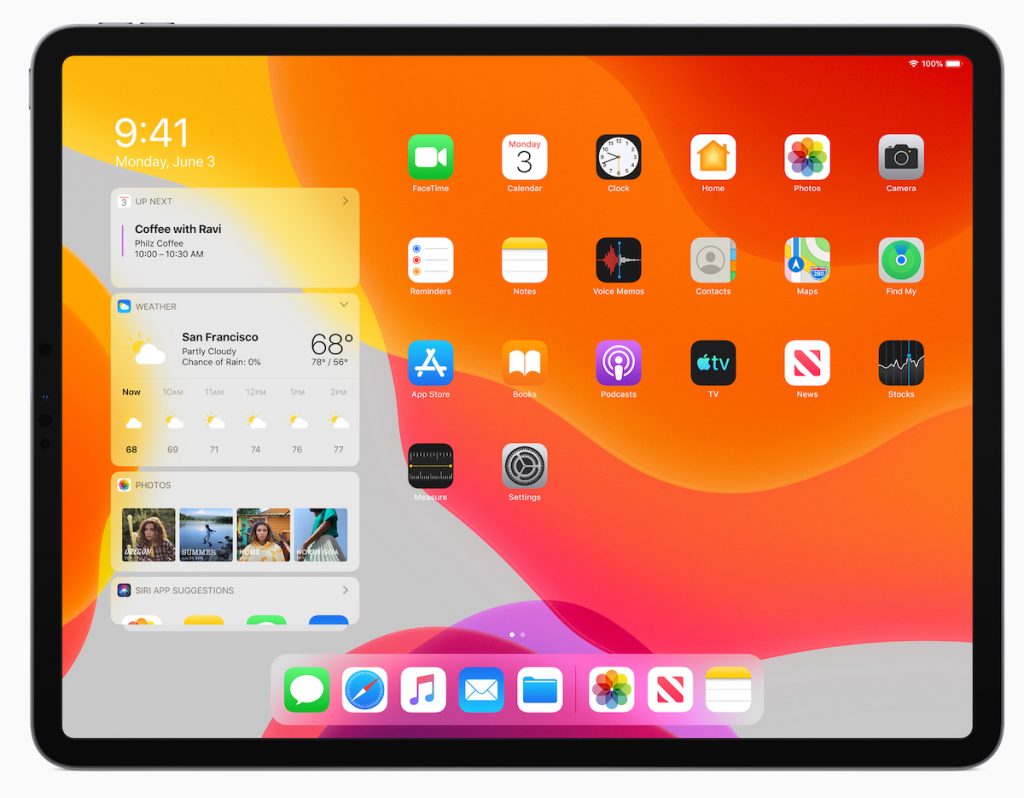
In iPadOS, the Home screen holds more icons in a tighter grid, and you can pin the Today View widgets on the side of the screen. Safari will be able to support complex Web apps like Google Docs, Squarespace, and WordPress, and it gains a download manager that lets you download files into the Files app.
Apple enhanced iPad multitasking so you can switch between apps in a Slide Over view, open multiple windows from the same app in Split View, and use App Exposé to navigate among your app combinations. Plus, text editing improves significantly, with direct access to the cursor and easier text selection, as well as new three-finger gestures for cut, copy, paste, and undo. The iPad even gets full-featured font management, and you’ll be able to buy fonts from the App Store.
iPadOS won’t work on many older iPad models, though it is compatible with all iPad Pro models, the fifth- and sixth-generation iPad, the iPad mini 4 and fifth-generation iPad mini, and the iPad Air 2 and third-generation iPad Air.
watchOS 6
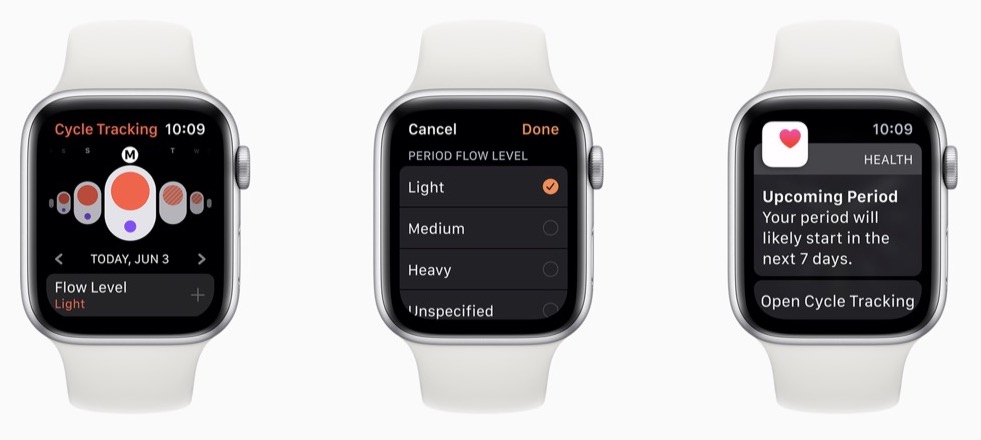
With watchOS 6, Apple is working hard on health and fitness capabilities for the Apple Watch. The company has added a Noise app that can warn you when sounds approach dangerous levels and a Cycle Tracking app that helps women monitor their periods and predict windows of optimal fertility. And, the Activity app has picked up trending features so you can see how you’re doing across time in a number of health metrics.
Apple has also untethered the Apple Watch from the iPhone to an extent, allowing developers to create standalone watch apps that don’t require a companion iPhone app and opening an App Store for such apps that you can browse and search from your wrist.
Other new watchOS 6 apps include Audiobooks, Calculator, and Voice Memos. Plus, once you upgrade to watchOS 6, you’ll be able to choose from more faces and additional complications.
As with watchOS 5, watchOS 6 will work on all Apple Watch models other than the original unit, but not all features are available on all models.
tvOS 13
The big news for tvOS 13 is that it finally gets multi-user support, so everyone in a household will be able to have their own personalized experience. (Speaking of which, the HomePod will also support multiple users with iOS 13.)
Apple has redesigned the tvOS Home screen to show previews, added a slide-in Control Center like in iOS and watchOS, and updated the Music app to show lyrics in sync with the currently playing song. The screensaver also goes under the ocean so your cat can be entertained by all the fish.

Finally, in a move that will significantly enhance the forthcoming Apple Arcade game subscription service, both tvOS and iOS will support the Xbox One S and PlayStation DualShock 4 game controllers.
Mac Pro and Pro Display XDR
Although the Worldwide Developer Conference is mostly about Apple’s operating systems, the company took advantage of the keynote to show off the completely redesigned Mac Pro and its companion screen, the Pro Display XDR. The technical specs of both are astonishing—Apple has done what looks like a fabulous job of designing the most modular, flexible, and powerful Mac ever, combined with a display that competes against reference monitors costing tens of thousands of dollars.
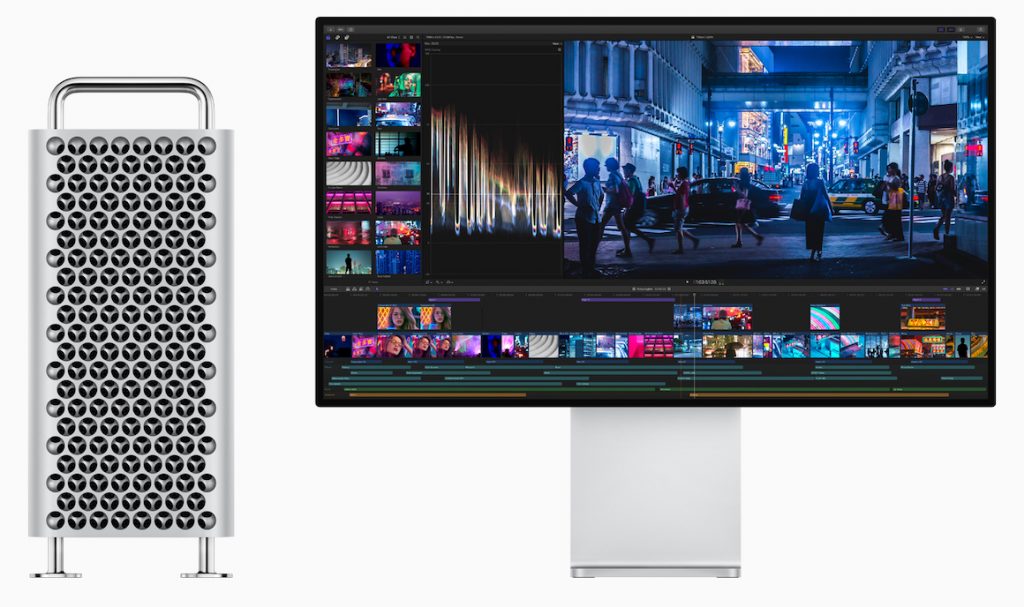
The Mac Pro will rely on Intel Xeon W processors with 8 to 28 cores, and you’ll be able to configure it with up to 1.5 TB (that’s terabytes!) of RAM. It has eight PCI Express expansion slots, into which you can install MPX modules that contain up to four AMD Radeon Pro graphics cards for massive number crunching performance. Another slot can hold Apple’s new Afterburner accelerator card for ProRes and ProRes RAW video acceleration, and a half-length slot contains Apple’s I/O card with two USB-3 ports, two Thunderbolt 3 ports, and to 10 Gb Ethernet ports; there are two more Thunderbolt 3 ports on the top of the case. Storage starts at 256 GB of SSD and goes up to 4 TB.
All this fits into a stainless steel frame with an aluminum case that lifts off to provide access to all sides of the Mac Pro. It has a massive 1.4-kilowatt power supply and relies on three fans and a blower to keep the unit cool. It even has handles on the top and optional wheels in case you need to move it around regularly.

Accompanying the Mac Pro will be Apple’s first monitor in years, the Pro Display XDR. It’s a 32-inch 6K screen that supports P3 wide and 10-bit color that can display more than 1 billion colors accurately. It’s also incredibly bright and can sustain 1000 nits of full-screen brightness or peak at up to 1600 nits.

If your eyes glazed over reading those specs, this new hardware isn’t for you. Apple is aiming it at high-end professionals, the sort of people who happily spend many thousands of dollars on new hardware to enable faster video editing, data processing, or other performance-intensive tasks. The base-level Mac Pro will start at $6000, and the Pro Display adds another $5000. Even the Pro Stand (which provides tilt and height adjustment, plus rotates to portrait orientation) for the Pro Display costs $1000, so a tricked-out Mac Pro setup could easily exceed $20,000. So no, this is not a Mac for “the rest of us,” but it’s great to see Apple ensuring that the most demanding Mac users can stay on the platform.
(All images courtesy of Apple)
Social Media: Apple has previewed what’s coming with macOS 10.15 Catalina, iOS 13, watchOS 6, and tvOS 13 at its Worldwide Developer Conference, along with unveiling a new Mac Pro and the Pro Display XDR. Read on for what to expect in September!
by Steve Sorbo | Sep 13, 2018 | Uncategorized
Apple has thrown back the curtain on its latest batch of iPhones and a new model of the Apple Watch. The company also announced plans to release iOS 12, watchOS 5, and tvOS 12 on September 17th. macOS 10.14 Mojave will follow a week later on September 24th.
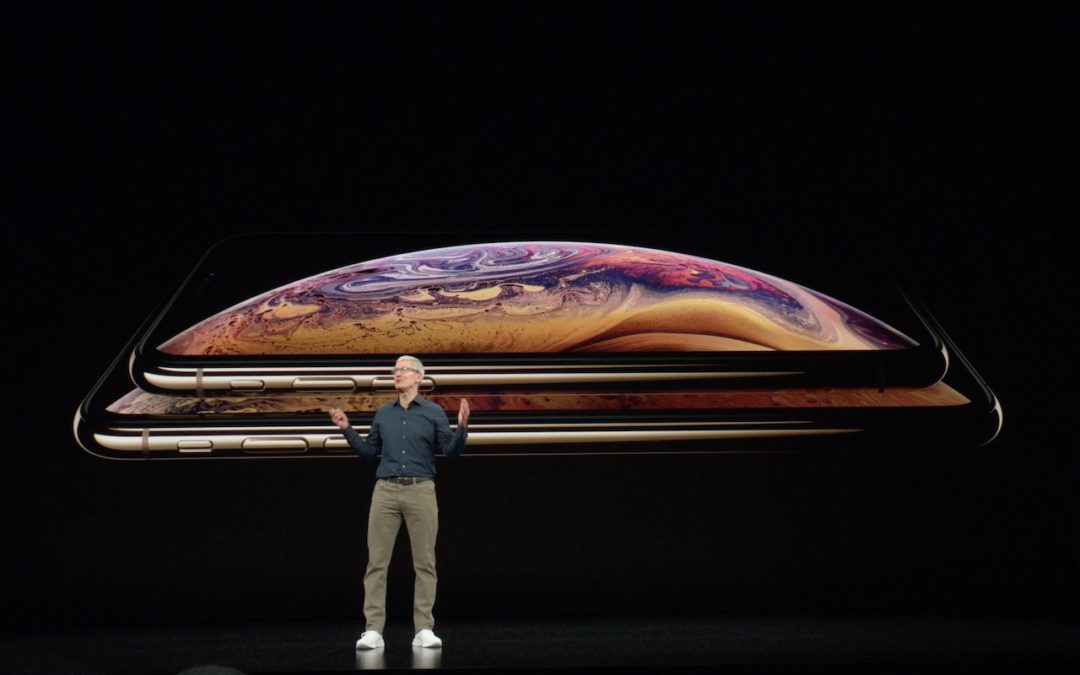
X Appeal: The New iPhone XS, iPhone XS Max, and iPhone XR
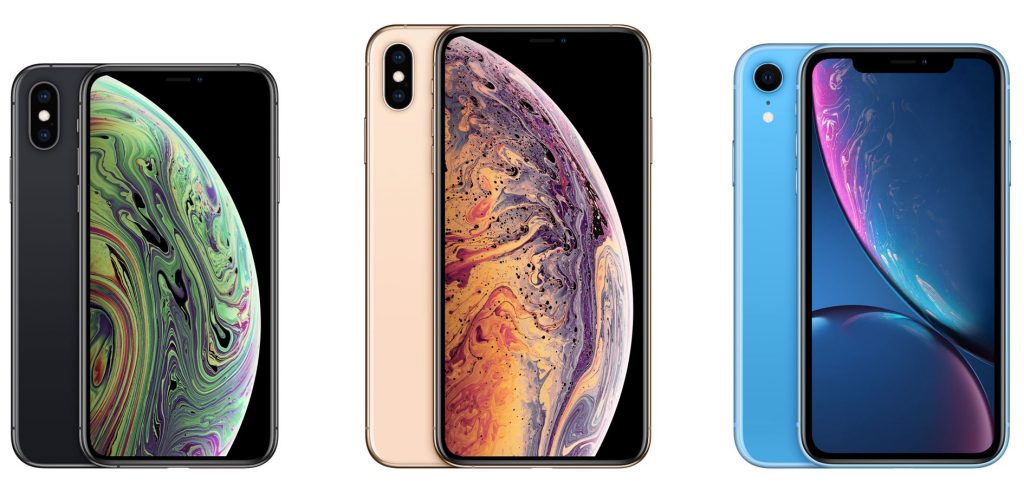
Last year’s iPhone X was a massive hit, so Apple has gone further down that road, dropping the Home button and Touch ID and focusing on Face ID in this year’s iPhones. There are three models: the mid-level iPhone XS (pronounced “Ten Ess”), the big iPhone XS Max, and the less-expensive iPhone XR.
You can pre-order the first two on September 14th, and they’ll ship a week later. Those who want an iPhone XR will have to wait until October 19th to pre-order. Here’s how the pricing shakes out:
- iPhone XS: 64 GB for $999, 256 GB for $1149, 512 GB for $1349
- iPhone XS Max: 64 GB for $1099, 256 GB for $1249, 512 GB for $1499
- iPhone XR: 64 GB for $749, 128 GB for $799, 256 GB for $899
What do you get for your money? All three new iPhones rely on Apple’s new A12 Bionic chip, which promises faster performance and reduced power consumption compared to last year’s A11 Bionic. Along with snappier overall responsiveness, the A12 Bionic enables new computational photography capabilities. Users of these iPhones will enjoy Smart HDR, which combines multiple images behind the scenes to produce better photos, and depth-of-field editing for adjusting the background behind a photo’s primary subject.
Apple also improved the camera hardware, enhancing the dual 12-megapixel rear-facing cameras in the iPhone XS and XS Max with larger, deeper pixels and an improved True Tone flash. The iPhone XR lacks 2x optical zoom because it has only a single rear-facing 12-megapixel camera, but thanks to the A12 Bionic’s processing power, it can still take photos in Portrait mode and do depth-of-field editing. The rear-facing cameras on all three models can capture up to 4K video at 60 frames per second—now with stereo sound. The front-facing camera on each iPhone is a 7-megapixel TrueDepth camera that can also capture 1080p video.
If you carry separate work and personal phones, or if you travel abroad frequently, you’ll appreciate the new dual-SIM capability that lets these iPhones support two phone numbers simultaneously, each with their own plan.
What differentiates these iPhones from one another? One big difference is the screens.
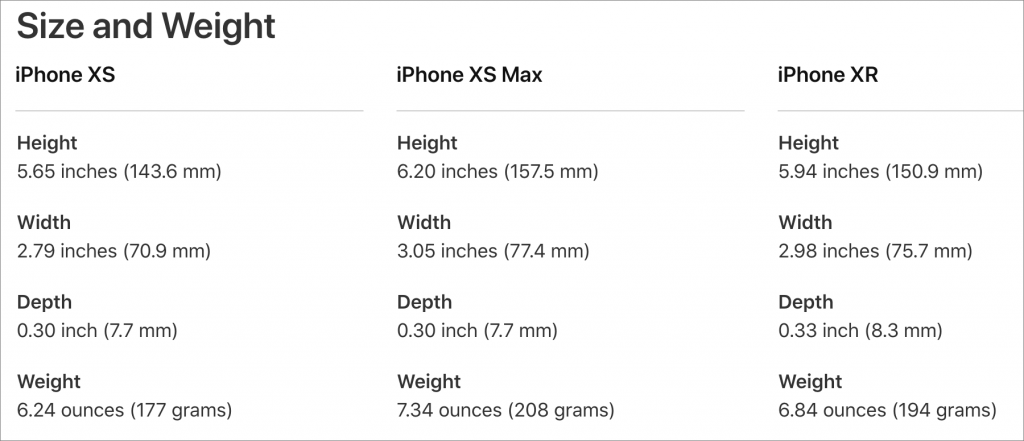
- iPhone XS: 5.8-inch OLED “Super Retina HD” display with a 2436-by-1125 resolution at 458 ppi
- iPhone XS Max: 6.5-inch OLED “Super Retina HD” display with a 2688-by-1242 resolution at 458 ppi
- iPhone XR: 6.1-inch LCD “Liquid Retina” display with a 1792-by-828 resolution at 326 ppi
Apple makes much of the iPhone XR’s LCD display, which is essentially a newer and larger version of the screen in last year’s iPhone 8. It won’t look as good as the OLED screens in the iPhone XS models, but unless you’re watching a lot of video or playing photo-realistic games, you may not notice.
Another difference between these models is size. The iPhone XS is the smallest, clocking in at a few millimeters and grams under the iPhone XR. On the other end of the spectrum, the iPhone XS Max has essentially the same dimensions as the previous iPhone Plus models.
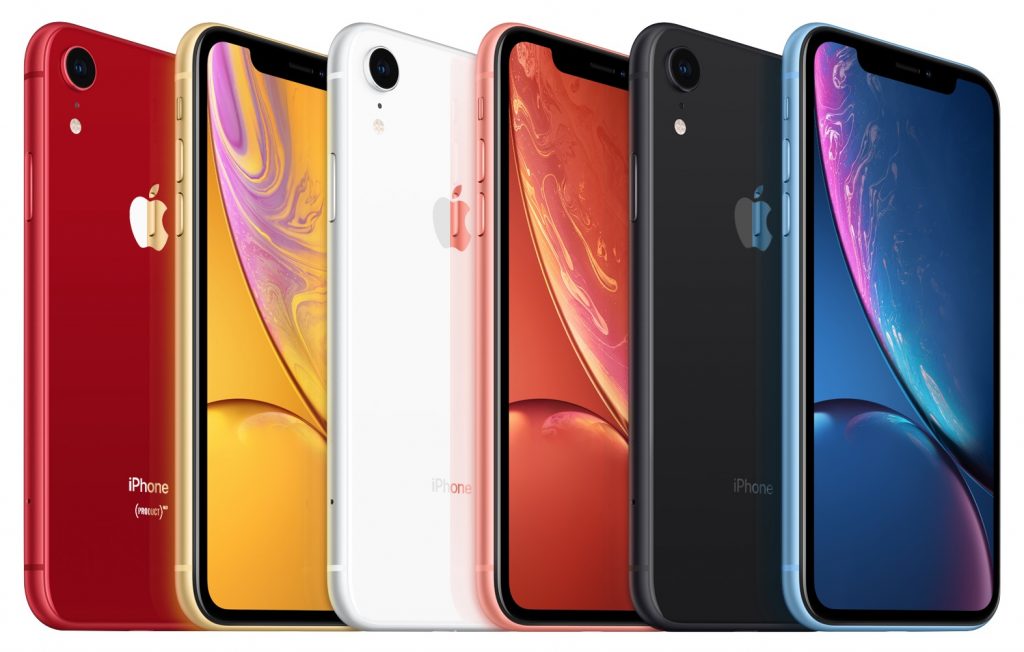
The other major difference between the iPhone XR and the iPhone XS models is the case material. The iPhone XS models have glass backs and are edged in stainless steel that comes in silver, space gray, and gold. In contrast, the iPhone XR features colorful aluminum casings in red, yellow, white, coral, black, and blue. Both are gorgeous, but if you’re like many people, a protective case will prevent you from appreciating the case material.
Should you consider upgrading to one of these new models? If your existing iPhone is on life support, absolutely. And, if you want the latest and greatest, the iPhone XS models are the best iPhones ever, particularly for photography. But for those with functional iPhones from the past few years, these new models are less compelling, especially since iOS 12 promises to speed up older devices as far back as the iPhone 5s.
If you decide to buy one, which model you choose probably depends on how much you’re willing to spend since these are Apple’s most expensive iPhones ever. The iPhone XR combines modern technology with a lower price than the other two models, and the decision between the iPhone XS and XS Max comes down to size and cost. Finally, if the prices for the new models are too high, you can still get the iPhone 7 starting at $449 and the iPhone 8 at $599.
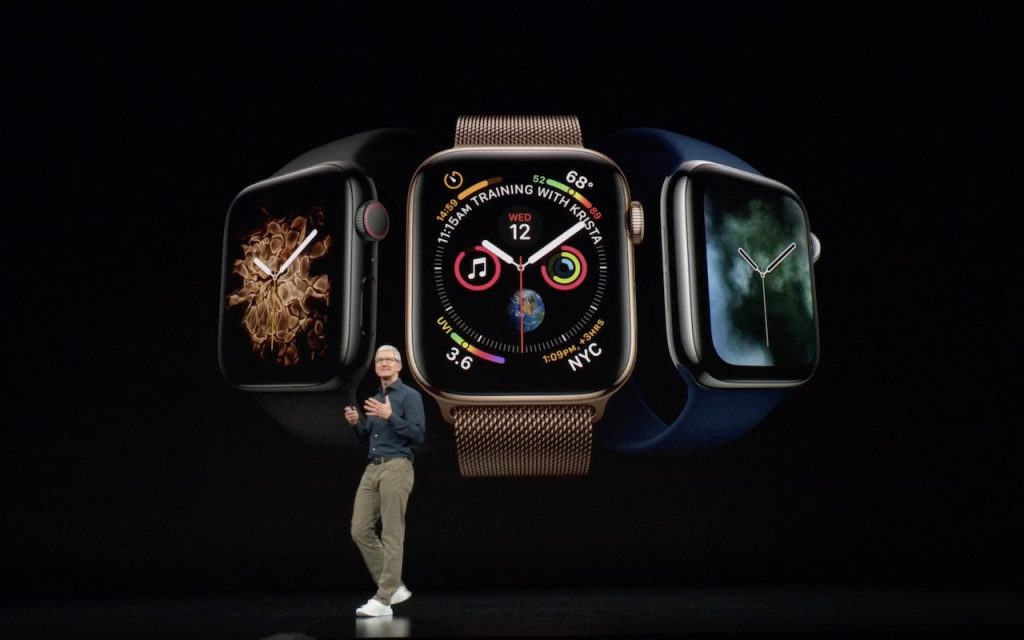
Apple Watch Series 4: Bigger Screens and Health Monitoring
In a first for the Apple Watch line, Apple changed the size and shape of the Apple Watch Series 4, boosting the vertical screen dimensions to 40mm and 44mm, up from 38mm and 42mm, and making the screens a little wider to retain the same proportions. However, the new models are 1.1mm thinner and thus have less total volume. You’ll want to try on the different models before buying to see how they look and feel on your wrist. Happily, the Series 4 can use the same bands as previous models.
Apple claims the new display, which extends into the corners of the screen, is “edge-to-edge,” and while there still is a black border, it’s smaller than before. The overall viewing area is about 30% larger.
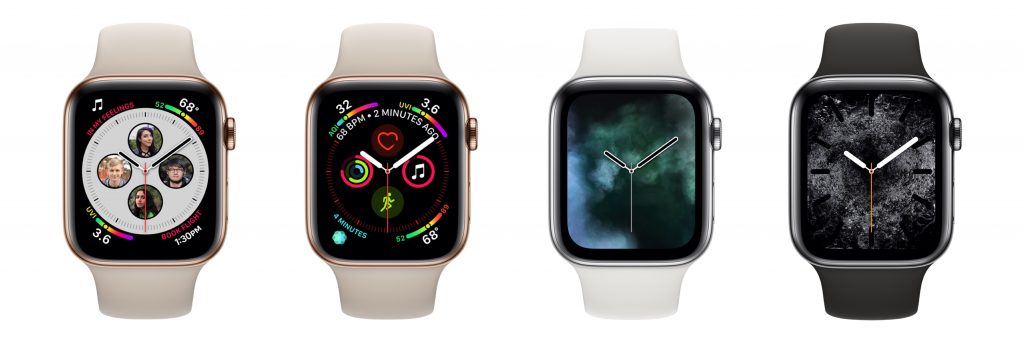
To use the extra screen space effectively and show off the power of its new S4 chip, the Series 4 comes with some new faces. The Infograph face can incorporate up to eight complications, the Breathe face moves in time with a deep breath, and Vapor, Fire, Water, and Liquid Metal faces animate behind virtual clock hands.
More practically, the Apple Watch Series 4 incorporates new and enhanced sensors. Later this year, the electrodes built into the Digital Crown and the back crystal let you record an electrocardiogram and, after 30 seconds, receive a heart rhythm classification that can identify signs of atrial fibrillation. Recordings are stored securely in the Health app, where you can share them with doctors. Even if you don’t use the ECG app manually, the Series 4 analyzes your heart rhythms in the background and alerts you if it detects irregular rhythms or if the heart rate exceeds or falls below a threshold.
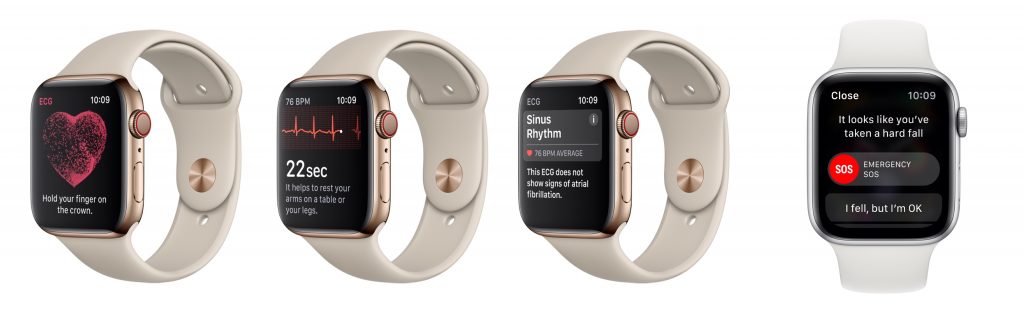
Plus, the Series 4 can now use its accelerometer and gyroscope to detect hard falls. If you fall, the Apple Watch sends you an alert, and if you don’t move for 60 seconds after the notification, it calls emergency services and notifies your emergency contacts of your location.
Other improvements include a speaker that is 50% louder, a relocated microphone to make calls clearer, haptic feedback in the Digital Crown, a back made of sapphire crystal and ceramic for better cellular reception, and Bluetooth 5 for faster data transfer over greater distances.
All this technology comes at a cost, and Apple has raised prices to match. GPS-only models of the Apple Watch Series 4 cost $399, and cellular-capable models are $499 (plus you’ll need to pay an additional $10–$15 for a cell plan). The Apple Watch Series 3 remains available at lower prices: $279 for GPS and $379 for cellular. You can pre-order on September 14th, and the Series 4 will ship on September 21st.
Our take is that the new health-monitoring features of the Apple Watch Series 4 are compelling for anyone who is concerned about falls or heart monitoring. But the increased prices may steer those who are mostly interested in fitness features and iPhone notifications to the cheaper Series 3.
Social Media: It’s official! Apple has announced the snazzy new iPhone XS, massive iPhone XS Max, and budget-friendly iPhone XR, along with the Apple Watch Series 4, which could literally save your life. Read more on our blog:
Recent Comments