
by Steve Sorbo | May 1, 2026 | Uncategorized
On the Mac, every file type opens in a particular app by default, but it’s easy to open a PDF, image, or text file in a different app. In the Finder’s Get Info window, you can also reset the default app so that, for example, JPEGs open in Photoshop or Affinity instead of Preview. That’s all now possible in iOS 26 and iPadOS 26 as well. In the Files app on an iPhone or iPad, touch and hold a file to bring up a menu. Tap Open With, then select an app to open the file once in a different app without changing the default. To reset the default app for that file type, tap Get Info, then select an app from the Always Open With list.

(Featured image based on an original by iStock.com/Tippapatt)
Social Media: iOS 26 and iPadOS 26 finally let you choose which app opens your files—just like on the Mac. Here’s how to use Open With and set new defaults in the Files app.

by Steve Sorbo | May 1, 2026 | Uncategorized
The latest scam to watch out for is fake websites that try to get you to open Script Editor directly from your browser with a pre-filled AppleScript. Don’t do this! Security researchers at Jamf Threat Labs documented an attack where a convincing Apple-themed page claiming to help “reclaim disk space” prompted users to allow Script Editor to open, then used the applescript:// URL scheme to open a seemingly legitimate script that—if the user ran it—would download and install the Atomic Stealer malware. In macOS 26.4, a new warning in Script Editor flags the script as from an unidentified developer, which should alert more users to the danger. (Yet another reason to install macOS updates!) The rule is simple: never run an AppleScript unless you wrote it yourself or acquired the code from a source you trust. If a website asks to open Script Editor—or any other app—click Cancel, and if you ever see this warning, close the script immediately. No legitimate webpage needs to run scripts on your Mac.

(Featured image based on an original by iStock.com/Prostock-Studio)
Social Media: Attackers are now using fake websites to open Script Editor with pre-filled malicious scripts. Never run an AppleScript from any source you don’t completely trust!

by Steve Sorbo | May 1, 2026 | Uncategorized
Safari’s compact tab bar option, which saves vertical space by placing the address bar in the current tab, went missing in the initial releases of macOS 26 Tahoe and iPadOS 26. Only Apple knows why this helpful option disappeared (Liquid Glass?), but as of macOS 26.4 and iPadOS 26.4, it’s back! On the Mac, select it in Safari > Settings > Tabs; on the iPad, look in Settings > Apps > Safari.

(Featured image based on an original by iStock.com/czekma13)
Social Media: Those who have been missing Safari’s compact tab bar are in luck—it’s back as of macOS 26.4 and iPadOS 26.4. The compact tab bar is a welcome way to save vertical space for content.

by Steve Sorbo | May 1, 2026 | Uncategorized
We always recommend buying from reputable manufacturers rather than no-name brands, especially for products with lithium-ion batteries, such as power banks, Bluetooth speakers, flashlights, power tools, e-bikes, and more. In a 2025 study, industrial scanning company Lumafield CT-scanned over 1,000 lithium-ion battery cells from ten different brands, including reputable manufacturers like Samsung and Panasonic, as well as low-cost and outright counterfeit brands sold through retailers like Temu. The results were troubling: nearly 8% of the low-cost and counterfeit batteries had dangerous manufacturing defects that significantly increase the risk of internal short-circuiting and battery overheating, potentially leading to fires. None of the name-brand batteries showed these defects. The few dollars you might save on a no-name battery aren’t worth the risk.

(Featured image by iStock.com/Pradit_Ph)
Social Media: A study found that nearly 8% of cheap lithium-ion batteries have dangerous manufacturing defects that can cause catastrophic failure—even fires—while name-brand cells had none. Stick with reputable brands.
by Steve Sorbo | May 1, 2026 | Uncategorized
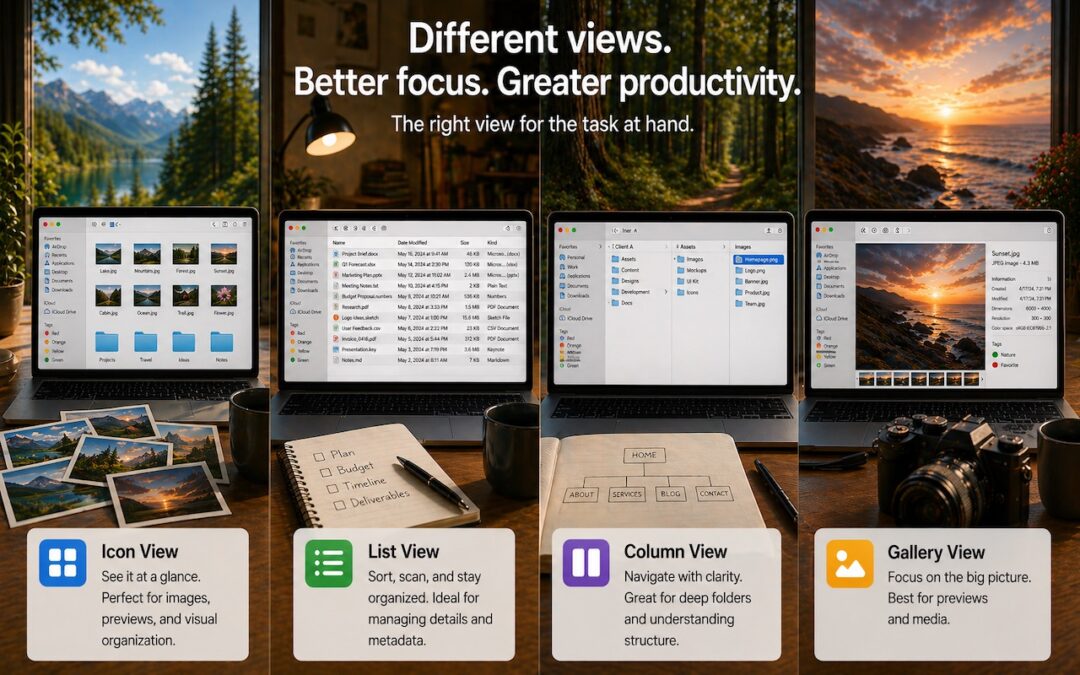
If you can work comfortably with the Mac’s four Finder views, you’ll enjoy an easier experience when you try to get to your folders and files. Each view has its pros and cons, so using the best view for the job at hand will make you more productive. Here’s a look at the Icon, List, Column, and Gallery views, plus tips on quickly switching views and setting up default views.
You switch between views in the active window by choosing View > as Icons, as List, as Columns, or as Gallery. Alternatively, click one of the view icons in a window’s toolbar. It’s worth memorizing the keyboard shortcuts for List (Command-2) and Column (Command-3) views so you can switch to them quickly if a particular window isn’t in your preferred view.
Icon View
Viewing files and folders as thumbnails is the most visual approach and works best for people who think spatially—this icon is below that other one. Such people often prefer to arrange icons manually to create memorable groupings, but the Finder can also automatically arrange them in a grid, sorted by different criteria. Icon view works well for:
- The Desktop: The desktop can only display its contents in Icon view, though you can open the Desktop folder in a window and use any view in that window.
- Folders with few items: When a window shows only a handful of items, icons make selection easy. That’s why most software distribution disk images use Icon view to display the app and an icon in the Applications folder.
- Photos or other images: Because icons for images can show a preview of the image (rather than just the document type thumbnail), Icon view with a relatively large icon size provides a useful visual preview.

To customize Icon view, choose View > Show View Options. You can adjust icon size, grid spacing, text size, label position, and background color—or even a background photo. Group By organizes icons into categories, while Sort By keeps them organized by name, date, or other metadata. For folders containing images, increasing the icon size creates a more useful visual preview.
The main limitation of Icon view is that it shows minimal metadata—just the filename and, optionally, item info such as image dimensions. It also becomes unwieldy with more than a few files, since scrolling through numerous icons is inefficient.
List View
When a folder contains more than a few items, List view is usually the most efficient way to work with it. It displays files in rows with sortable columns showing metadata such as date modified, size, kind, and more. List view is ideal for users who think about files in terms of attributes—when something was created, how large it is, or what type it is—rather than visual appearance. Use it for:
- Folders containing many items: Once a folder has more items than fit without scrolling, List view makes it easier to view and select items.
- Sorting folders by date or size: Whenever you want to see the most recent files at the top, or quickly identify which consume the most disk space, you can click the Date Modified or Size column header to sort by that criterion.
- Work with nested folders: Disclosure triangles let you view the contents of multiple nested folders without opening a new window, making it easier to see and move items between them.

Customize the visible columns by choosing View > Show View Options or by Control-clicking any column header. You can add columns for tags, version, comments, and other metadata. Drag column headers to rearrange their order, and drag the dividers between headers to adjust column widths. Sort columns by clicking a column header; click it again to reverse the sort.
Column View
Column view shows your folder hierarchy as a series of columns, with each column representing one level of the hierarchy. Selecting a folder reveals its contents in the next column to the right, while selecting a file displays a preview and metadata in the rightmost column. Column view is popular with power users who frequently navigate between folders and appreciate seeing the path to the current location. It’s perfect for:
- Navigating deep folder structures: Move through nested folders quickly without opening multiple windows.
- Understanding file locations: The column layout shows exactly where a file sits in your folder hierarchy.
- Quick previews: Select any file to see a preview without opening it or using Quick Look.
- Drag-and-drop organization: Easily drag files between folders visible in different columns.

One useful option in View > Show View Options is “Resize columns to fit filenames,” added in macOS 26.1, which automatically adjusts column widths to accommodate the longest visible filename. Alternatively, you can manually resize all columns at once by Option-double-clicking any column divider. You can also set a default column width and choose whether to show icons and the preview column.
Gallery View
Gallery view dedicates most of the window to a large preview of the selected file, with a row of thumbnails along the bottom and a metadata sidebar on the right. Those who work primarily with images find it useful. It’s designed for:
- Reviewing photos and videos: The large preview makes it easy to evaluate images without opening them.
- Previewing documents: PDFs, presentations, and other documents display their first page, which can help with identifying similarly named files.
- Quick Actions: The sidebar includes Quick Action buttons for common tasks such as rotating images, using markup tools, creating PDFs, and trimming video.
- Checking metadata: The sidebar can show detailed information, including EXIF data for photos.

Gallery view becomes less useful for folders containing mostly text documents or applications, where the large preview adds little value. Honestly, we seldom use it.
Setting Default Views
The Finder remembers your view preferences for each folder individually, so once set, they should stick. However, if you’re in Column or List view and open a folder set to appear in Gallery view by selecting it or clicking its disclosure triangle, you’ll stay in the previous view. To open the folder in its assigned view, double-click its icon.
When you create a new Finder window with File > New Finder Window, it opens the folder specified in Finder > Settings > General. Set that folder to your preferred view so new windows open as you like.
To ensure a specific folder always opens in a particular view, select it, choose View > Show View Options, and select the Always Open In checkbox. To have its subfolders open in that view too, also select Browse In, if available.
You can also apply view settings to other folders. In View Options, configure the settings exactly as you want—icon size, text size, visible columns, and so on—then click Use as Defaults. This makes those settings the default for any folder displayed in that same view type (Icon, List, or Gallery) that doesn’t have its own custom settings. You must set defaults separately for each view type; Column view lacks this option entirely. To revert to system defaults, hold the Option key and the button changes to Restore Defaults.
There’s no need to commit to one view. Switch freely based on what you’re doing—List view for finding recent files or cleaning up, Column view for navigating a folder hierarchy, or Gallery or Icon view for reviewing images. The best view is whichever helps you accomplish your current task most efficiently.
(Featured image generated by Adam Engst with ChatGPT)
Social Media: Icon, List, Column, or Gallery? Each Finder view has its strengths. Match the right view to your task and spend less time wrestling with your files.

Recent Comments