
by Steve Sorbo | Aug 1, 2025 | Uncategorized
Those who prefer keeping their hands on the keyboard may appreciate Apple’s addition of a new shortcut in macOS 15 Sequoia. Instead of Control-clicking to open a contextual menu with commands to apply to the current selection, you can press Control-Return. Since it’s so new, it doesn’t work in some older apps or those that sidestep standard Apple frameworks, but it’s worth adding to your keyboard repertoire.

(Featured image by iStock.com/Milatas)
Social Media: macOS 15 Sequoia has a new way you can keep your hands on the keyboard. Press Control-Return to open contextual menus—no mouse required. Try it out and speed up your workflow on your Mac.

by Steve Sorbo | Aug 1, 2025 | Uncategorized
Let’s look at how to keep your body comfortable and healthy when you interact physically with your Mac. In a word: ergonomics. You’ll find it easier to focus and be productive if nothing hurts. Plus, you want to avoid long-term problems like carpal tunnel syndrome and chronic neck strain.
While some workplace setups may be outside your control, there are usually ways to improve your ergonomics. Here’s what to check and adjust to make your workspace more comfortable and productive. We also recommend working through the Cornell Ergonomic Workstation Advisor, a 35-question worksheet.
Chair Setup
Your chair is the linchpin of an ergonomic office setup. Adjust the seat height so your feet rest flat on the floor and your knees are at roughly 90º–120º. Use a stable footrest if you can’t put your feet flat on the ground without compressing your thighs. Note that if you are smaller or larger than average, you may need a chair designed for your size.
You should be able to sit up straight comfortably, which may be aided by a lower back support. If your chair lacks one, consider adding a firm bolster or even a rolled towel for more support. Make sure armrests support your elbows without forcing you to raise your shoulders.

Once your chair is adjusted correctly, it’s time to consider the desk surface, which affects the placement of your display, keyboard, and mouse or trackpad.
Screen Position and Height
When it comes to your Mac’s display, there are two vital measurements to reduce neck and shoulder strain: the distance from your eyes and the height off the desk surface.
Roughly speaking, the display should be positioned at arm’s length, or 18–36 inches (45–91 cm) away. However, that depends on your vision—if the text isn’t clear at the recommended distance, you should either have your prescription checked or move the display until you can read it easily. If you find yourself bringing it too close, use the Larger Text options in System Settings > Displays to make the text readable at a reasonable distance.

For height, with modern large displays, aim to have your eye level about a quarter of the way down the display, so that three-quarters of the display is below your eye level. That generates a slight downward gaze to the center of the screen. If you wear bifocals, position the display a little lower to account for how you raise your head to look through the different viewing zones in your lenses.
Some displays have highly configurable stands, making it easy to adjust their height. For those that offer only tilt adjustments, you can raise the screen by placing a properly sized book or printer paper underneath it; just make sure it’s stable. If your desk doesn’t lend itself to the necessary positioning, a monitor arm could make it easier to adjust.
It’s important to minimize glare from lights above you or windows behind you. Tilting the top of the display slightly away from you can reduce glare and enhance comfort, but more significant adjustments may be necessary to avoid harsh natural light. If you need bright light for reading physical documents, opt for task lighting and keep the room lighting indirect. Regardless, you should always adjust the Mac’s brightness to match the room lighting; the Automatically Adjust Brightness switch in System Settings > Displays can help. If you use your Mac before bed, turning on Night Shift may improve sleep.

What about multiple displays? Depending on their size, you may inadvertently create a situation where the text is too far away to read comfortably, causing you to lean in. Nor do you want to be working with your head turned all the time.
If you have a primary display, position it in front of you and put the secondary display off to the side, angled in. If you have two identical displays, angle them in slightly to create a visual arc and sit so that you can work comfortably on the inner halves of each screen. Those connecting a laptop to two displays can keep it below them. However you arrange your displays, click Arrange in System Settings > Displays to rearrange the virtual screens so they match your physical layout.

Keyboard and Mouse/Trackpad Placement
For comfortable typing and mousing, your hands should be level and straight, with your elbows comfortably close to your body and your shoulders relaxed. To make that happen, the keyboard and pointing device should be at elbow height when you’re sitting and close enough that you don’t need to lean forward. The mouse or trackpad should be as close to the keyboard as possible so you don’t have to reach for it.
Getting the height of the keyboard and pointing device right—while also keeping the display at the right height—can be tricky because many desks aren’t very adjustable. If the desk is too high and can’t be lowered, consider an adjustable keyboard tray to reposition the keyboard and mouse/trackpad at the correct height.
It’s also important that you don’t compress your wrist by pressing down on the desk surface or even a soft wrist rest. To rest your hands when you’re not typing, use a cushioned palm rest in front of your keyboard.
Special Considerations for Laptops
Unfortunately, it’s impossible to maintain good ergonomics on a laptop because there’s no separation between the keyboard and the display. That’s fine for shorter work sessions and when you have no control over your environment, such as on an airplane or in a coffee shop. But if you work on a laptop all day long, choose one of two basic options to improve your ergonomics:
- Continue to use the laptop’s keyboard and trackpad at a good typing height, but add an external display at the ergonomic viewing height. You can continue to use the laptop’s display for ambient apps—such as Messages, Calendar, and Music—that you glance at and use briefly.
- Elevate the laptop so its display is at the correct viewing height, and add an external keyboard and mouse/trackpad at the correct typing height. A wide variety of laptop stands are available for this purpose.
The first approach may be more expensive, but it can increase productivity by allowing you to view more content on the screen at once.
Movement and Breaks
No matter how ergonomic your setup is, it’s terrible for the human body to remain in one position for extended periods. Research suggests that sitting for more than 8 hours daily, especially without physical activity, is associated with cardiovascular disease, diabetes, obesity, cancer, depression, and even cognitive decline. Luckily, it’s easy to reduce these risks:
- Change positions frequently; chairs that allow movement can help activate muscles and improve circulation.
- Take regular breaks every 30–60 minutes. Standing or walking for 5 minutes is ideal, but even a minute or two helps. Even if you work at a standing desk, you must still move around.
- Consider a sit-stand desk that allows you to switch between sitting and standing.
- Look away from your screen at least every 20 minutes for 20 seconds, focusing on an object at least 20 feet away.
- Exercise regularly to counterbalance being sedentary—experts recommend a weekly regimen of 150–300 minutes of moderate exercise or 75–150 minutes of vigorous exercise.
Remember: Small ergonomic adjustments can make a big difference in comfort. If you experience persistent discomfort in an office environment, consult with your supervisor or HR department about your ergonomic equipment options. Your organization may also provide access to an ergonomics expert who can come to your workspace and ensure that your chair and other workspace items are adjusted for optimal comfort.
(Featured image by iStock.com/dragana991)
Social Media: Don’t let poor ergonomics get in the way of getting your work done. Get expert advice on adjusting your chair, positioning your display, and arranging your desk to prevent discomfort and boost productivity at your Mac.

by Steve Sorbo | Aug 1, 2025 | Uncategorized
Although Apple’s products and services generally live up to Steve Jobs’s phrase “it just works,” problems do occur, opening the door to scams targeting users seeking tech support. As professional providers of technical support, we’ve seen firsthand how these frauds have evolved from simple pop-ups to disturbingly convincing operations and how easy it is to fall for them if you’re caught off guard. Here’s what to watch for and how to protect yourself.
Tech Support Scam Tactics
Tech support scams have evolved over the years, but the playbook remains the same: get you on the phone, make you panic, and extract money or sensitive information. Here’s what you need to watch out for, based on what clients are reporting to us:
- Phishing texts claiming suspicious activity: You receive a text purporting to be from Apple, warning of “unusual activity” or an “unauthorized Apple Pay transaction” and urging you to call an Apple Support number. The message looks official, but the number connects you to a scammer, not Apple.

- Robocalls and emails about iCloud changes or breaches: In this scam, you receive an automated call or email purporting to be from Apple, often with the caller ID spoofed to Apple’s actual support number. You’re told to press a number or call back, and once you’re talking to a scammer, they try to get you to grant remote access and change your password so that they can take over your account.

- Fake support numbers in Google search results: A particularly sneaky scam manipulates Google search results and ads. When you search for support (e.g., “Apple help,” “HP support”), you may see ads or top results that appear official. As Malwarebytes Labs reports, clicking these can inject a fake support number directly into the search field on the company’s real website. Call that number, and you’re routed to a scammer who may demand remote access, payment for bogus repairs, or your personal data.

- Pop-ups, ads, and emails mimicking Apple: Fake pop-ups, ads, or emails warn of urgent issues, such as the egregiously expensive Apple TV subscription in the example below, and provide numbers to call to rectify the situation. As always, provided phone numbers lead to scammers.

How to Protect Yourself from Tech Support Scams
In an ideal world, you’d be able to identify every scam for what it is and simply move on with your life. Unfortunately, because technical problems make many of us anxious, the scams can cause people to panic and lose their critical thinking skills. To stay safe, remember these rules:
- Never respond to unsolicited tech support contacts: Ignore phone calls, texts, emails, or pop-ups claiming to be from Apple, Microsoft, Google, Amazon, or any other company.
- Don’t trust caller ID or search results: Scammers can spoof numbers and manipulate search results or ads. Always confirm contact info directly from the company’s official website—type the URL yourself or use a bookmark.
- Be wary of urgent demands: Real tech support doesn’t threaten you or create artificial urgency.
- Never allow remote access unless you initiated the contact: If you didn’t reach out to a trusted provider, don’t let anyone access your device.
- Use only official support channels: When you do need support, contact the company directly. For Apple, use support.apple.com or call 1-800-275-2273 in the United States (look here for other countries’ phone numbers).
If you work with us and we need to call you (for example, because of proactive monitoring), we’ll always identify ourselves clearly. If you’re unsure, hang up and call us back at a number you already have—we won’t be offended.
How to Recover from Being Scammed
What should you (or someone you’re helping) do after falling for a tech support scam? First, we’re here to help for real, so don’t be shy or embarrassed about contacting us for assistance. There are three main areas to focus on:
- Change passwords: Immediately change any passwords that you may have shared or entered during a remote access session. If you use the same passwords on any other websites, change those passwords too. Wherever possible, turn on two-factor authentication. A password manager like 1Password or Apple’s Passwords makes all this easier.
- Run anti-malware software: If you already have legitimate anti-malware software, run it to make sure the scammer didn’t install anything malicious on your Mac. If you don’t have up-to-date anti-malware software, contact us to see what we currently recommend.
- Protect your finances: If you paid for any bogus services, call your credit card company and reverse the charges; you’ll also undoubtedly get a new credit card number. Monitor financial accounts for unauthorized transactions and document any suspicious activity.
Finally, if you do fall prey to a scam, watch out for subsequent “refund scams.” Months after the initial incident, you might get a call offering a refund or compensation, or claims that the scam company is being investigated. These are almost always also scams designed to extract more money or information. If anyone contacts you about a previous tech support interaction, verify their legitimacy independently via official channels.
(Featured image by iStock.com/Supatman)
Social Media: Think you can spot a tech support scam? Today’s fraudsters are using everything from spoofed caller ID to manipulated search results. Here’s what to watch for and how to stay safe.

by Steve Sorbo | Aug 1, 2025 | Uncategorized
A massive heat dome earlier this summer exposed large swaths of the United States to heat index values approaching or exceeding 120ºF, underscoring the importance of protecting our devices from heat damage. Overheating can degrade performance, interrupt charging, disable features, and cause general device instability.
When Temperature Becomes a Problem
You might be surprised by how sensitive electronic devices are to high temperatures. Apple says that most Apple devices—whether we’re talking about an iPhone or iPad, AirPods, Apple Watch, or Mac—work best in ambient temperatures under 95ºF (35ºC). The Apple Watch Ultra is a notable exception, capable of operating in temperatures up to 130ºF (55ºC), but even then, Apple recommends charging at a lower temperature.
These temperature limits are frequently surpassed in everyday situations. A parked car in direct sunlight can reach 130ºF (54ºC) within an hour, even with windows cracked open, and continue climbing from there. Just as you’d never leave children or pets in a parked car, your iPhone, iPad, or MacBook shouldn’t be left behind during a trip to the beach. Even when powered off, Apple devices shouldn’t be stored in temperatures above 113ºF (45ºC).
The risk isn’t limited to vehicles. Poorly ventilated homes and offices without air conditioning can become surprisingly hot, particularly affecting computers that run continuously and lack proper airflow. If you have a second-generation HomePod or HomePod mini—both of which have temperature and humidity sensors—you can ask Siri, “What’s the temperature in here?”
How Heat Hurts Your Devices
An often overlooked point is that electronic devices generate significant heat during operation, and high ambient temperatures make it harder for them to shed that heat effectively, increasing the risk of thermal throttling or shutdown. Under heavy workloads, internal components like an iMac’s CPU can reach temperatures as high as 212ºF (100ºC)—literally the boiling point of water.
Temperatures that exceed component design specs can have the following detrimental effects:
- Chip instability: As heat rises, electrons vibrate more intensely (thermal noise), leading to increased error rates and timing issues in chips. This can result in unpredictable behavior or system crashes.
- Battery degradation: While lithium-ion batteries actually perform well in high temperatures, the accelerated chemical reactions inside them can reduce their long-term lifespan.
- Physical damage: Repeated heating and cooling cycles can create microscopic stress fractures as different materials expand and contract at varying rates, potentially leading to component failure.
While some heat-related issues resolve themselves once devices cool down, others can cause permanent damage. Prevention is crucial.
Your Mac will typically warn you of dangerous temperatures by ramping up its cooling fans. (The fanless MacBook Air can’t provide this warning.) If you notice your Mac’s fans running at a high speed for several minutes:
- Close unnecessary apps, especially those that heavily tax the CPU.
- If the fans continue at full speed, restart to eliminate problematic background processes.
- If restarting doesn’t quiet the fans, shut down your Mac and let it cool off.
An overheated Mac may exhibit erratic behavior or shut down unexpectedly. Be particularly cognizant of potential heat-related issues during initial device setup, restoring from backup, using graphics-intensive apps or games, and streaming high-quality video, all of which can drive up internal temperatures on their own.

Without cooling fans, iPhones and iPads rely on other methods to manage high temperatures. When these devices detect dangerous heat levels, they’ll display a warning and automatically protect themselves through various measures. Apple says you might notice some of the following behaviors with an overheating iPhone or iPad:
- Slowed or interrupted charging (including wireless charging)
- Automatic display dimming—it might even go entirely dark
- Weakened cellular signals as radios enter a low-power state
- Disabled camera flash and other features
- Reduced performance, especially in graphics-heavy apps
Navigation deserves special mention: if your iPhone overheats during GPS navigation, it may display a “Temperature: iPhone needs to cool down” alert instead of the map view. Don’t worry—you’ll still receive voice guidance, and the screen will briefly activate to show important turns.
Apple Watches will also display a special warning screen if they get too hot.

Preventing Heat Damage
Protecting your Apple devices from heat damage mostly comes down to following these common-sense guidelines:
- Limit high-temperature use: When ambient temperatures exceed 95ºF (35ºC), as happens outside in Phoenix from May through September, minimize device usage or, ideally, avoid it entirely.
- Never leave devices in parked cars: The greenhouse effect can quickly create dangerous temperatures. If it happens accidentally, allow the device to cool completely before use.
- Ensure proper ventilation:
- Keep Mac ventilation ports unobstructed.
- Avoid using laptops on soft surfaces like beds or pillows.
- Periodically clean ventilation ports with compressed air.
- Never cover an open laptop’s keyboard.
- Don’t stack items on top of a Mac mini or Mac Studio.
- Watch server areas: Monitor temperatures in server closets and ensure adequate cooling through ventilation, fans, or air conditioning.
Remember: if you’re feeling uncomfortably hot, your devices probably are too. The temperatures that stress electronics tend to be similarly stressful for humans, making your comfort a good gauge of potential risk to your devices.
(Featured image based on an original by iStock.com/margouillatphotos)
Social Media: Think your Apple devices can handle the summer heat? Think again. Discover how high temperatures can damage your iPhone, iPad, and Mac—and what you can do to keep them safe.
by Steve Sorbo | Aug 1, 2025 | Uncategorized
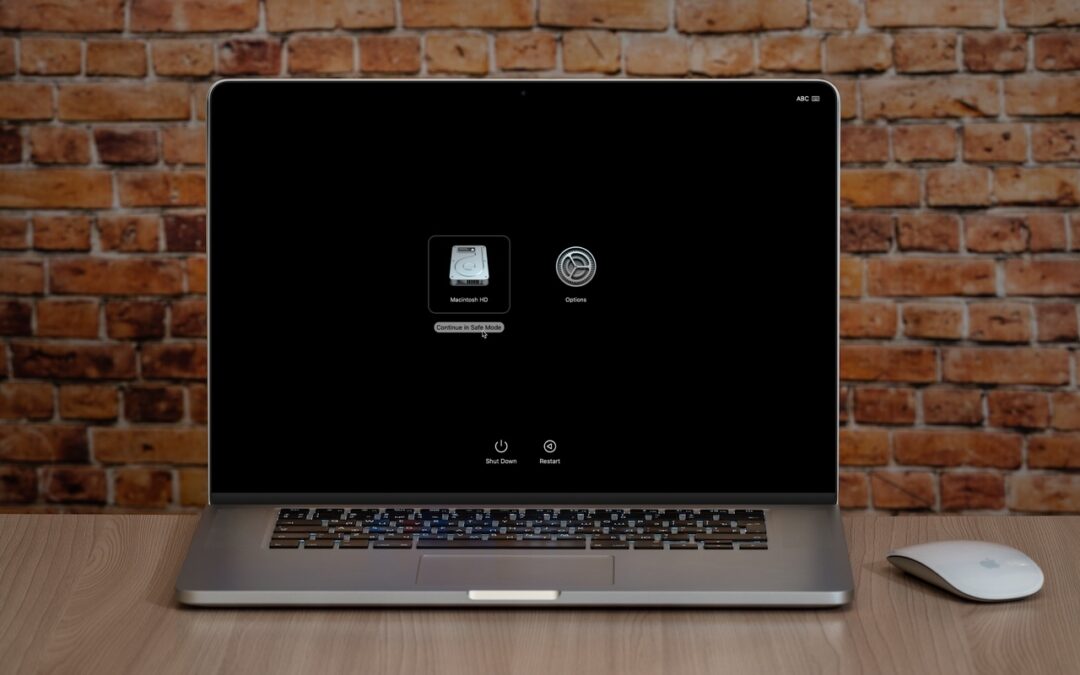
Although Macs are highly reliable, unusual problems can still rear their ugly heads. Often, these issues are caused by software you’ve installed or accessories you’ve connected. If you’re experiencing Mac misbehavior that isn’t easily fixed by restarting, updating software, or unplugging a dodgy device, try safe mode. (Seriously, before checking if safe mode will help with a problem, you should always restart, ensure you’re running the latest version of macOS and any involved apps, and unplug non-essential peripherals.)
Safe mode is one of macOS’s key troubleshooting tools, though many users don’t know when or how to use it. By starting up your Mac with minimal required software and services, safe mode can help identify and resolve various system issues.
How to Enter Safe Mode
The process for entering Safe Mode varies depending on whether you have a Mac with Apple silicon or an Intel-based Mac.
For Macs with Apple silicon:
- Shut down your Mac.
- Press and hold the power button until the startup options appear.

- Select your startup disk.
- Hold the Shift key and click Continue in Safe Mode.
- Log in (you may need to do this twice). You’ll see “Safe Boot” in red in the menu bar on the login screen.

For Intel-based Macs:
- Restart your Mac.
- Press and hold the Shift key until you see the login window.
(If you have a firmware password, you must remove it in Recovery before starting up in safe mode.)
To verify that you’re in safe mode, click the Apple menu while holding the Option key, select System Information, and look for “Boot Mode: Safe” under Software. To exit safe mode, just restart your Mac normally.

What Safe Mode Does
When your Mac boots in safe mode, it performs several important functions designed to eliminate troubleshooting variables:
- Prevents non-essential software from loading, including third-party login items, kernel extensions, system extensions (the modern replacement for kernel extensions), and fonts not installed by macOS
- Clears some system caches, including font caches and the kernel cache
Apple also says that safe mode performs a basic check of your startup disk, but research from the community suggests that this check is no different from the one performed during a normal boot. If you suspect disk-related problems, use the First Aid feature of Disk Utility to conduct a more comprehensive (and much slower) test.
This minimal environment helps identify whether the problems are caused by software that loads during startup or by core system components. Safe mode also prevents many customizations and modifications from taking effect, making it easier to determine if third-party software is the cause of the issues.
However, the downside of using safe mode is that some macOS features may not work. According to Apple, these include “video capture, graphics performance, file sharing, Wi-Fi, accessibility, audio devices, and devices connected via USB, Thunderbolt, or FireWire.” In practice, some of these will work fine, but the main point is that you might not be able to do everything you want while in safe mode. It’s designed for troubleshooting, not regular use.
When to Use Safe Mode
Safe Mode is beneficial in several common scenarios:
- Identifying extension conflicts: If your Mac is misbehaving, booting in safe mode can help determine if third-party kernel or system extensions are the cause.
- Troubleshooting startup problems: If your Mac doesn’t start normally, safe mode might help you get in and address the issue.
- Installing updates: Although this is less necessary in recent versions of macOS, if a macOS update fails to install properly, trying again in safe mode often resolves the issue.
- Fixing update issues: Problems that appear after a macOS update—likely caused by outdated third-party software incompatible with the new version of macOS—can often be resolved by starting in safe mode.
- Performance problems: If your Mac is running slowly, safe mode can help identify whether login items or extensions are causing the issue.
- General diagnostics: Safe mode is a worthwhile initial step for diagnosing issues before attempting more complex solutions.
What Comes After Safe Mode
Once you’re in safe mode, it’s up to you to reproduce the problem you experienced earlier. Then, there are two possibilities:
- The problem persists in safe mode: While this result is not ideal, safe mode has still provided you with more troubleshooting information by eliminating third-party login items, extensions, and fonts from consideration, along with clearing certain caches. Since those aren’t the cause, try testing in a clean user account, disconnecting remaining peripherals, and reinstalling macOS.
- The problem goes away in safe mode: Great! First, restart your Mac to see if the problem has disappeared, as would be the case if it were related to corrupt caches. If the problem returns after restarting, you can narrow down the cause to third-party login items, extensions, or fonts. Remove third-party log-in items in System Settings > General > Login Items & Extensions. (We recommend taking a screenshot with Command-Shift-5 first, so you can remember how you were set up.) You can also disable extensions in System Settings > General > Login Items & Extensions by toggling their switches. Restart and test again. If that still doesn’t fix it, try testing in a clean user account to rule out any software issues tied to your main account.
The beauty of safe mode is that it’s easy to enter and entirely non-destructive. It may not help identify all possible problems, but it’s always worth trying after the simple steps of restarting your Mac, updating associated software, and unplugging non-essential peripherals.
(Featured image based on an original by iStock.com/Armastas)
Social Media: Having Mac problems? Before trying more complex solutions, restart in safe mode—your Mac’s stripped-down troubleshooting environment. It disables non-essential software and clears system caches to help identify and resolve common issues.

Recent Comments