by Steve Sorbo | Jul 3, 2026 | Uncategorized
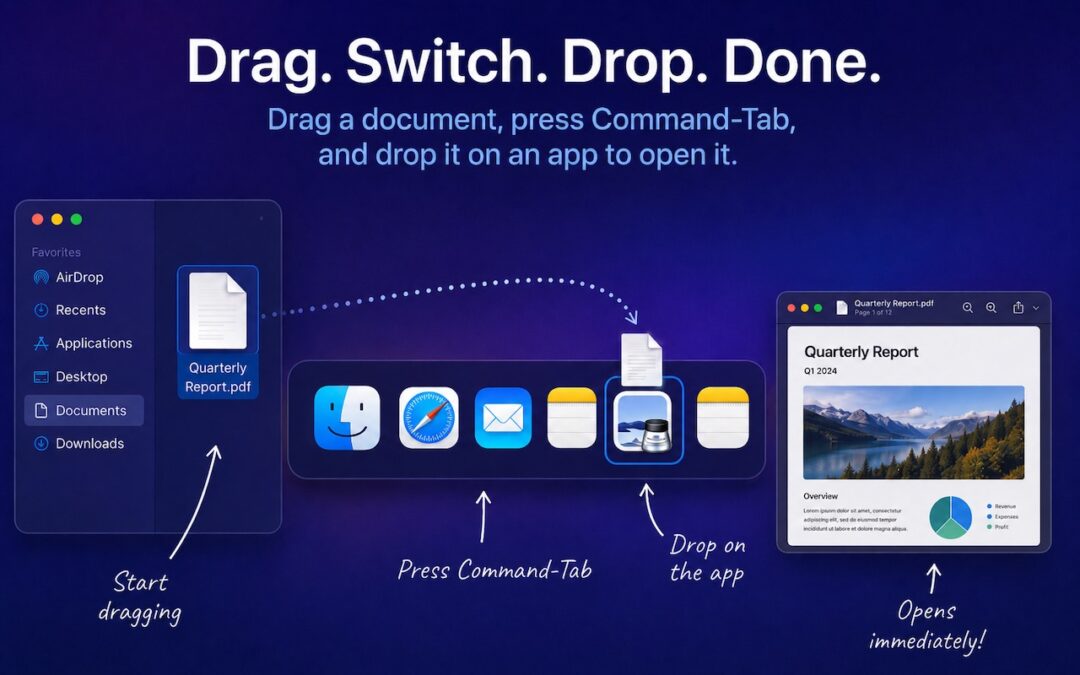
You undoubtedly know about pressing Command-Tab to bring up the macOS App Switcher and mousing to the app you want to switch to. Keyboard jockeys probably even know to keep holding Command down while pressing Tab or right-arrow to cycle to the right (press Shift-Tab, the grave accent/tilde key, or left-arrow to cycle to the left), before releasing the Command key to switch. But did you know you can start dragging something—say a document from the Finder—with your right hand, press Command-Tab with your left hand, and then drop the document on an app in the App Switcher to open it? Go ahead, give it a try!

(Featured image generated by Adam Engst with ChatGPT)
Social Media: Did you know you can open a file quickly by dragging it onto an app in the macOS App Switcher? Start dragging, press Command-Tab, and drop. It’s one of the App Switcher’s many tricks.

by Steve Sorbo | Jul 3, 2026 | Uncategorized
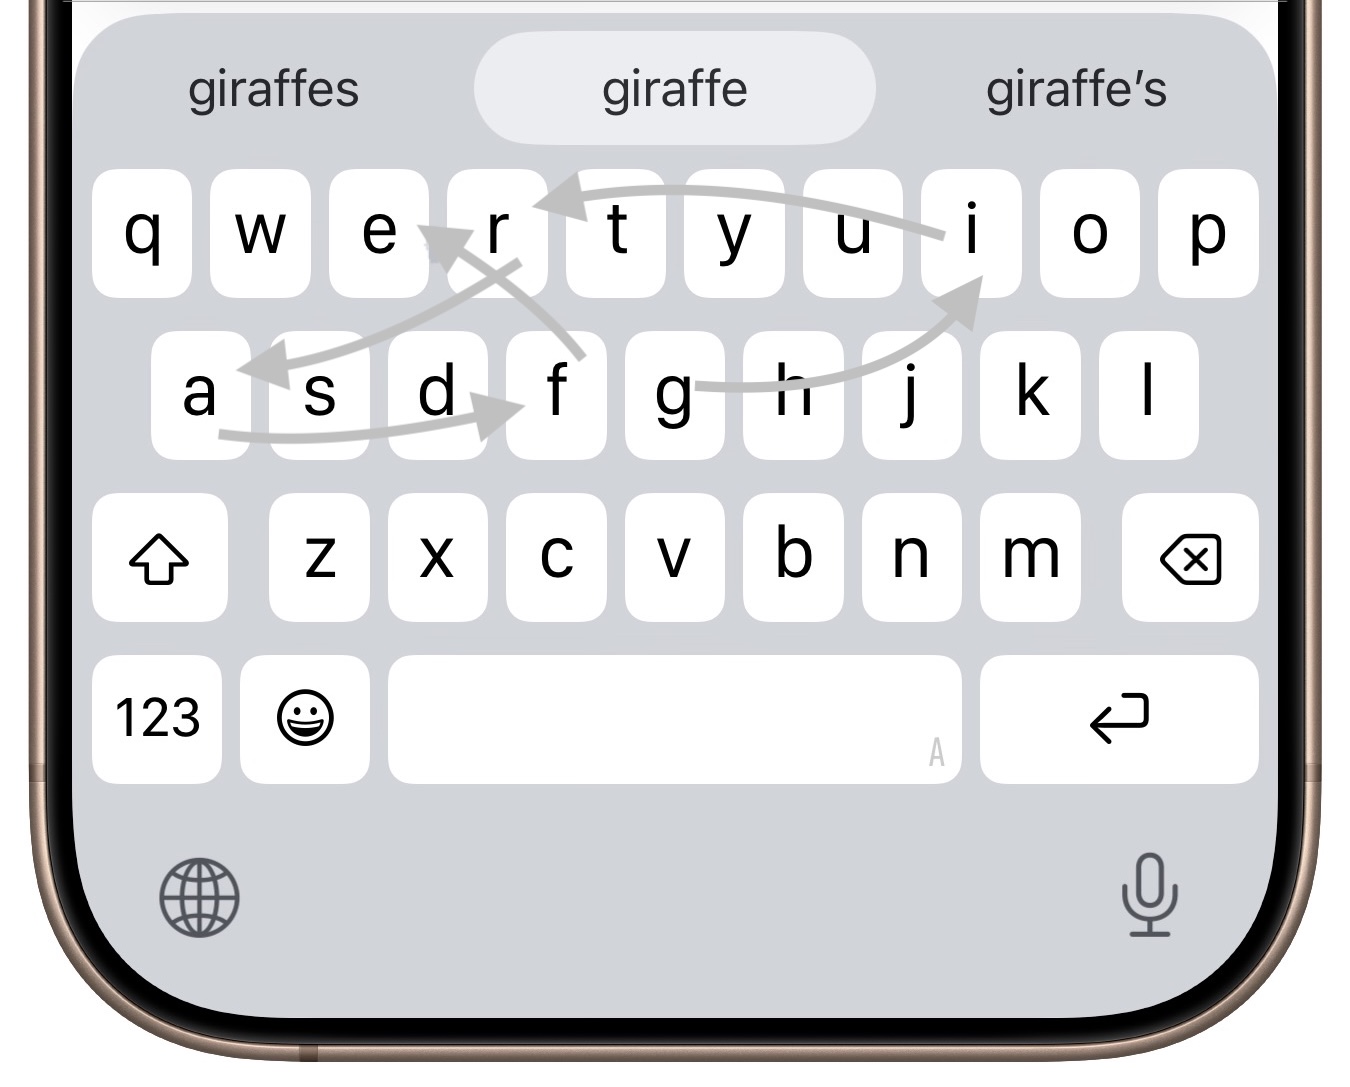
If you’ve had trouble moving from hunt-and-peck typing on the iPhone to the double-thumb typing approach many people prefer, consider QuickPath, better known as swipe typing. QuickPath isn’t new, but many people have never tried it seriously. With swipe typing, you put your finger down on the first letter of the desired word—say “giraffe”—and then drag it from the G to each subsequent letter in order. Although QuickPath’s detection code isn’t perfect, it does surprisingly well at recognizing the word you want most of the time. If QuickPath gets the word wrong, immediately tap the Delete key to remove the entire word and either try again (if you missed the right letters) or type it normally (if it’s an unusual word iOS doesn’t know). Learning to swipe type fluidly takes a little while, but if you’re unhappy with how well you type on the iPhone now, it’s worth trying.
(Featured image generated by Adam Engst with ChatGPT)
Social Media: Tired of hunt-and-peck typing on your iPhone? Try QuickPath—just drag your finger across each letter in a word to swipe-type it. It’s surprisingly accurate and worth learning.

by Steve Sorbo | Jul 3, 2026 | Uncategorized
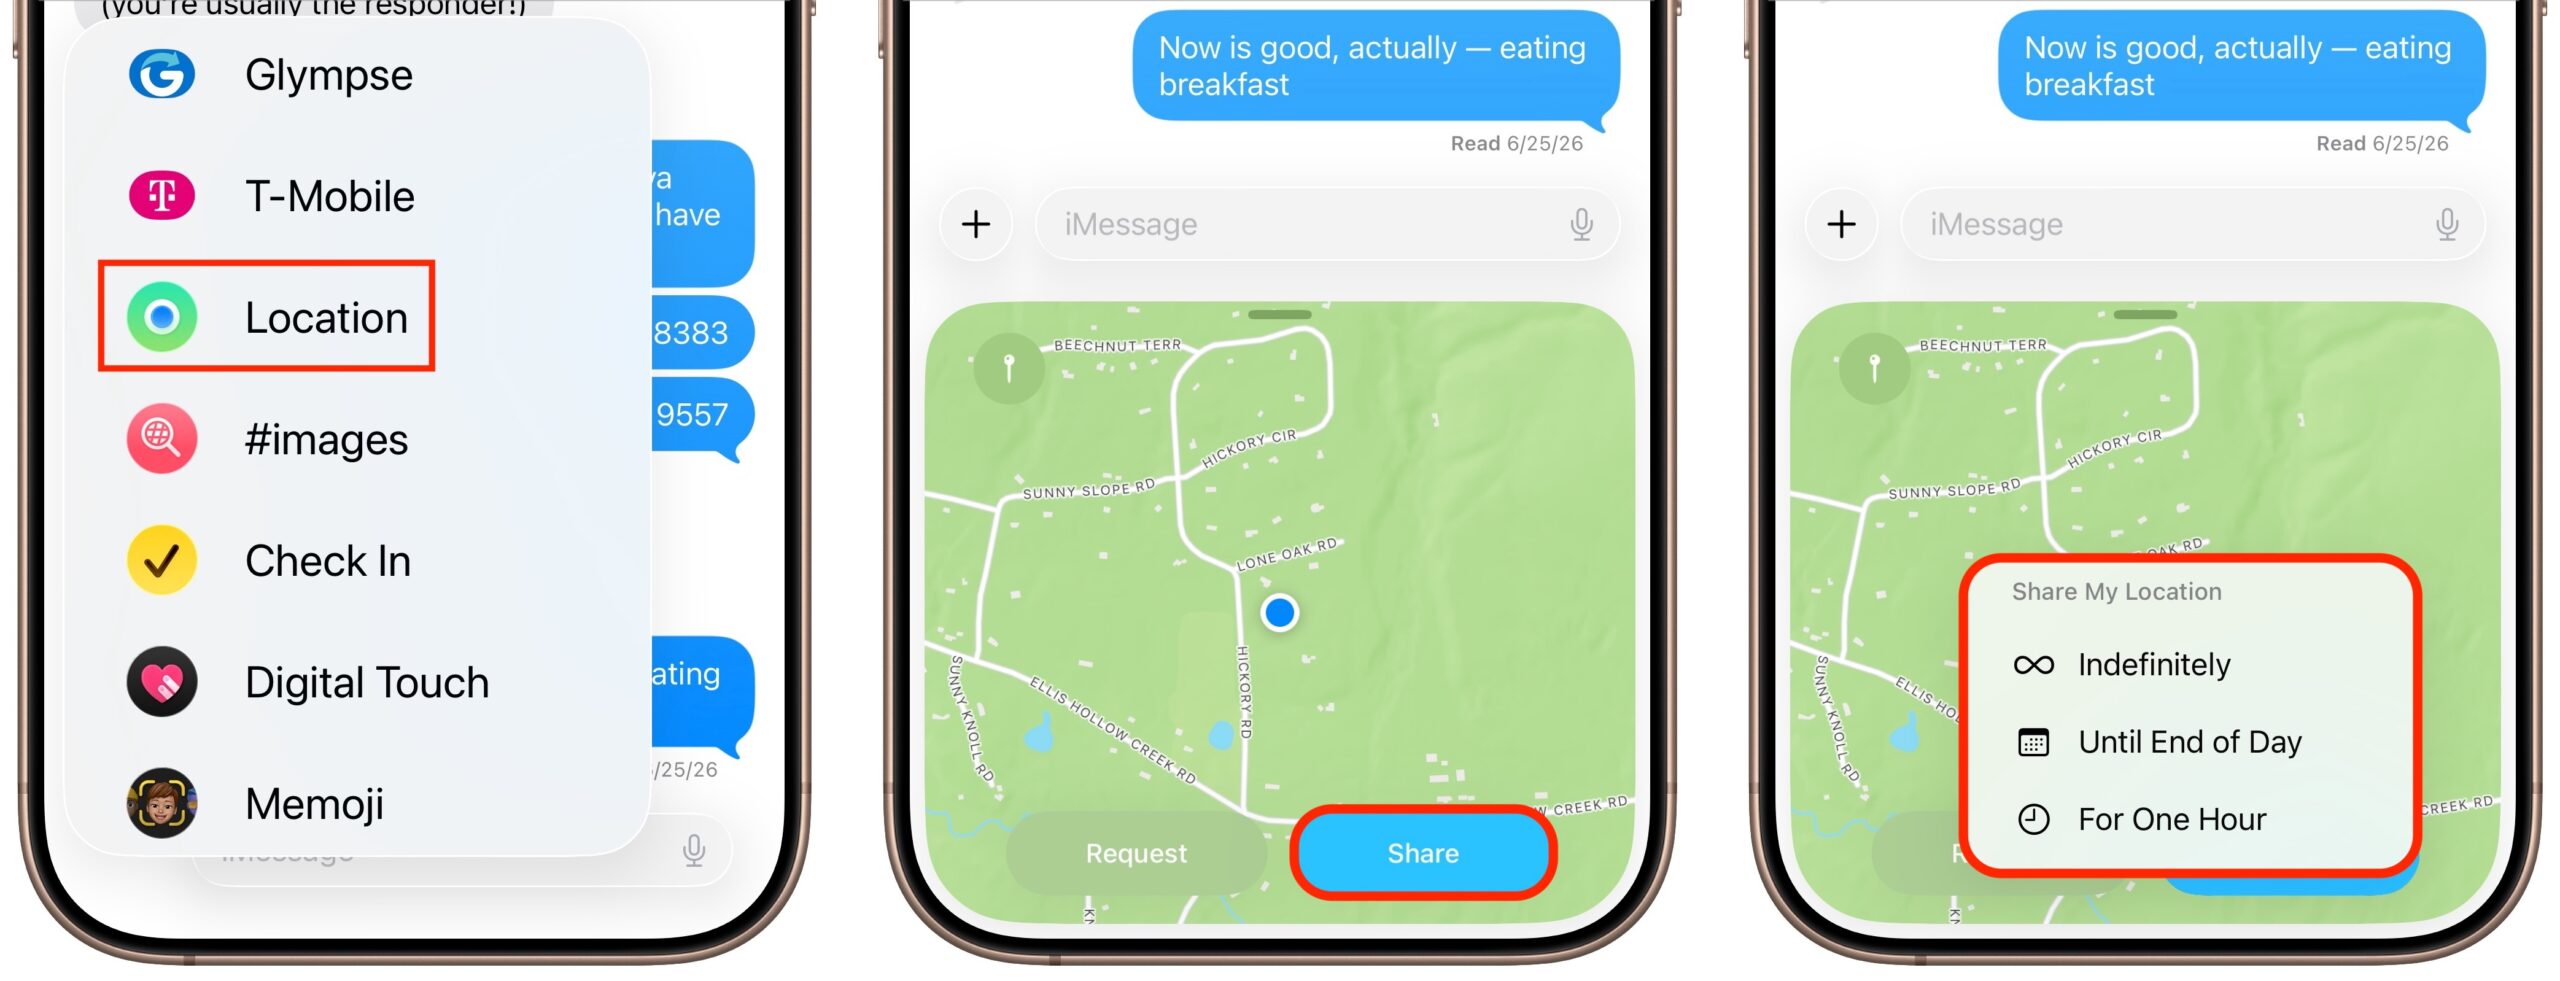
The next time you’re flying, driving, or biking to visit an iPhone-using friend or relative, try sharing your location temporarily so they can check in on your progress without constant “where are you now?” texts. In iOS 17 and later, open a Messages conversation with that person, tap the ⊕ button to the left of the message entry field, and tap Location. In the location-sharing control that appears, tap the Share button, then choose Until End of Day or For One Hour. You can also tap the Request button to ask the recipient to share their location with you. If you pick Indefinitely for the sharing duration and later wish to revoke it, open the Find My app, tap the People list, select the person, and tap Stop Sharing My Location.
(Featured image generated by Adam Engst with ChatGPT)
Social Media: Put an end to the “where are you now?” texts. iOS lets you temporarily share your location with friends and family while traveling—here’s how to set it up in Messages.

by Steve Sorbo | Jul 3, 2026 | Uncategorized
When ChatGPT launched in late 2022, using it was simple: you typed a prompt, and it generated text in response. That text came from a statistical model trained on data available at the time. If you asked ChatGPT about anything that had happened more recently, it either couldn’t help or would confidently make stuff up.
The chat interface that today’s AI systems still rely on has become more of a control panel than the system itself. What happens after you press Return may involve Web searches, file analysis, code execution, connected accounts, and even digital-world actions—all orchestrated behind the scenes. You need to understand what’s happening behind the chat box to evaluate the accuracy, quality, and utility of the answers that appear there.
Under the Hood of an AI System
The capabilities of a modern AI system include:
- Models generate text, analyze images, and work through problems. This is the traditional “AI” part, but it has improved hugely through better training techniques, longer conversations and documents, and extended reasoning time. Cutoff dates for training models remain an issue—some AIs think macOS 26 is still in beta.
- Retrieval pulls information from the Web, uploaded documents, or connected data sources. When an AI cites a source, it’s usually because retrieval happened. However, it’s still essential to check cited sources carefully because the URLs may be broken, and even when pages exist, they may not support the claims.
- Tools handle tasks the model can’t do on its own, such as analyzing numeric data, running code, creating visualizations, or searching databases. For many types of requests, the AI will write a script or call a tool to handle the work, dramatically increasing the likelihood that the results will be correct and making it easier to refine them.
- Connectors link AI systems to external platforms such as email, calendars, file storage, and Internet-hosted applications. They’re necessary so a system can work on personalized data (“Give me a timeline of the deliverables on the MacDavis project from our email conversations.”) and to connect with business data.
- Actions let AI systems do things in the digital world: send messages, create events, modify files, and interact with other software. Here is where AI stops merely advising and starts affecting real systems, so the safeguards need to be much stronger.
These capabilities don’t always appear together. A simple chatbot exchange may rely only on the model’s training. A research request may add retrieval and tools so the AI can search current sources, summarize what it finds, and run calculations or create charts. A workplace copilot may add connectors to email, calendars, cloud storage, customer records, or internal databases. A full-fledged agent adds actions, enabling the system to operate on your behalf.
It’s important to understand all the possibilities because each layer changes both what the AI can do and how much you should trust it. A model-only answer calls for skepticism (and perhaps a search). A search-based answer needs source checking. A tool-generated answer requires checking the inputs, method, and results. A connector-based answer warrants attention to the source of the data (and whether the permissions are too broad). And an action deserves a preview, an approval process, and ideally a way to undo mistakes.
What This Means for Trust, Privacy, and Control
This evolution from chatbot to assistant generally yields better results, but it also comes with new risks:
- Privacy isn’t just about what you type. It’s about what files you upload, what accounts you connect, and what the AI system can access. Putting confidential data into an AI could be problematic in numerous ways, not least regulatory compliance.
- Accuracy varies by task. Responses drawn purely from training data may be outdated or flat-out wrong, while search-informed answers reflect current sources. Asking an AI to “Confirm with a search” is a good way to get it to reassess what it has written with current information.
- Actions have consequences. When AI can send email, modify files, change settings, or interact with business systems, mistakes can have outsized impacts. This is why we strongly recommend caution about OpenClaw-style agents: giving any AI broad access to email, messaging, calendars, files, and applications creates security and reliability risks. Always preview any action—or AI-generated script you’re running externally—whose results could be difficult or impossible to reverse.
- Confidence isn’t correctness. AI outputs can sound polished and authoritative even when they contain errors, outdated information, or subtle misunderstandings of your intent. Any AI-generated work that informs decisions or will be seen by others deserves human review. Just as you wouldn’t base anything important on the work of a summer intern without checking first, you don’t want AI-generated work to go out if you can’t stand behind it.
For individuals, how you react to these risks mostly comes down to verification and restraint: check important sources, review important outputs, and don’t let AI take irreversible actions without approval. For organizations, the same principles must become policy because employees may already be using AI tools with company data without IT’s knowledge. To get ahead of the issue, organizations should:
- Audit what’s already happening. Talk with employees to find out what they’re already using, inventory online apps with embedded AI features, and check browser extensions, which often fly under the radar.
- Classify workflows by risk. Not all workflows need the same level of attention. Low-stakes tasks like brainstorming and text editing can proceed with commonsense guidelines. High-stakes outputs—client communications, financial analysis, security configurations—need human review before they go live.
- Evaluate tools carefully. Before approving any AI tool for general use, understand what data it accesses, whether it trains on your inputs, what actions it can take, and what logging is available. Most paid tools won’t train on your data, or can at least be configured not to, but the more important your data, the deeper your research should go.
- Create clear policies and train employees. Define which tools are approved, what data can be entered into AI systems, when human review is required, and what’s prohibited. Employees need practical guidance on how to apply the policies to their actual workflows. Don’t assume that an email or two is sufficient—training is essential.
The biggest mistake people make about AI today is underestimating both its risks and rewards because they’re still thinking about ChatGPT from 2023. The chat box may look the same, but it now sits in front of systems that are vastly more powerful, meaning that it’s more important than ever to consider when to trust them, when to verify them, and when to keep them at arm’s length.
(Featured image by iStock.com/tadamichi)
Social Media: Still thinking of AI as just a chatbot? Today’s tools search the Web, run code, access your files, and can even take actions—all triggered from the same chat interface. The results are better but come with new responsibilities.

by Steve Sorbo | Jul 3, 2026 | Uncategorized
Control Center debuted on the iPhone over a decade ago in iOS 7 and made its way to the Mac in 2020 with macOS 11 Big Sur. However, through macOS 15 Sequoia, Mac users who wanted to tweak Control Center for their needs were limited to turning specific controls on or off. With macOS 26 Tahoe, Apple completely overhauled Control Center, enabling users to remove, rearrange, and add controls, including new ones from independent developers.
If you mostly ignore Control Center on your Mac, it’s worth another look in Tahoe. The big win of Control Center is that it provides quick access to numerous controls without occupying valuable space in the menu bar, a limitation that MacBook users regularly encounter. Now that you can personalize Control Center, it’s much more useful than before.
Before we explain how to customize Control Center, let’s look at the basics.
Open and Use Control Center
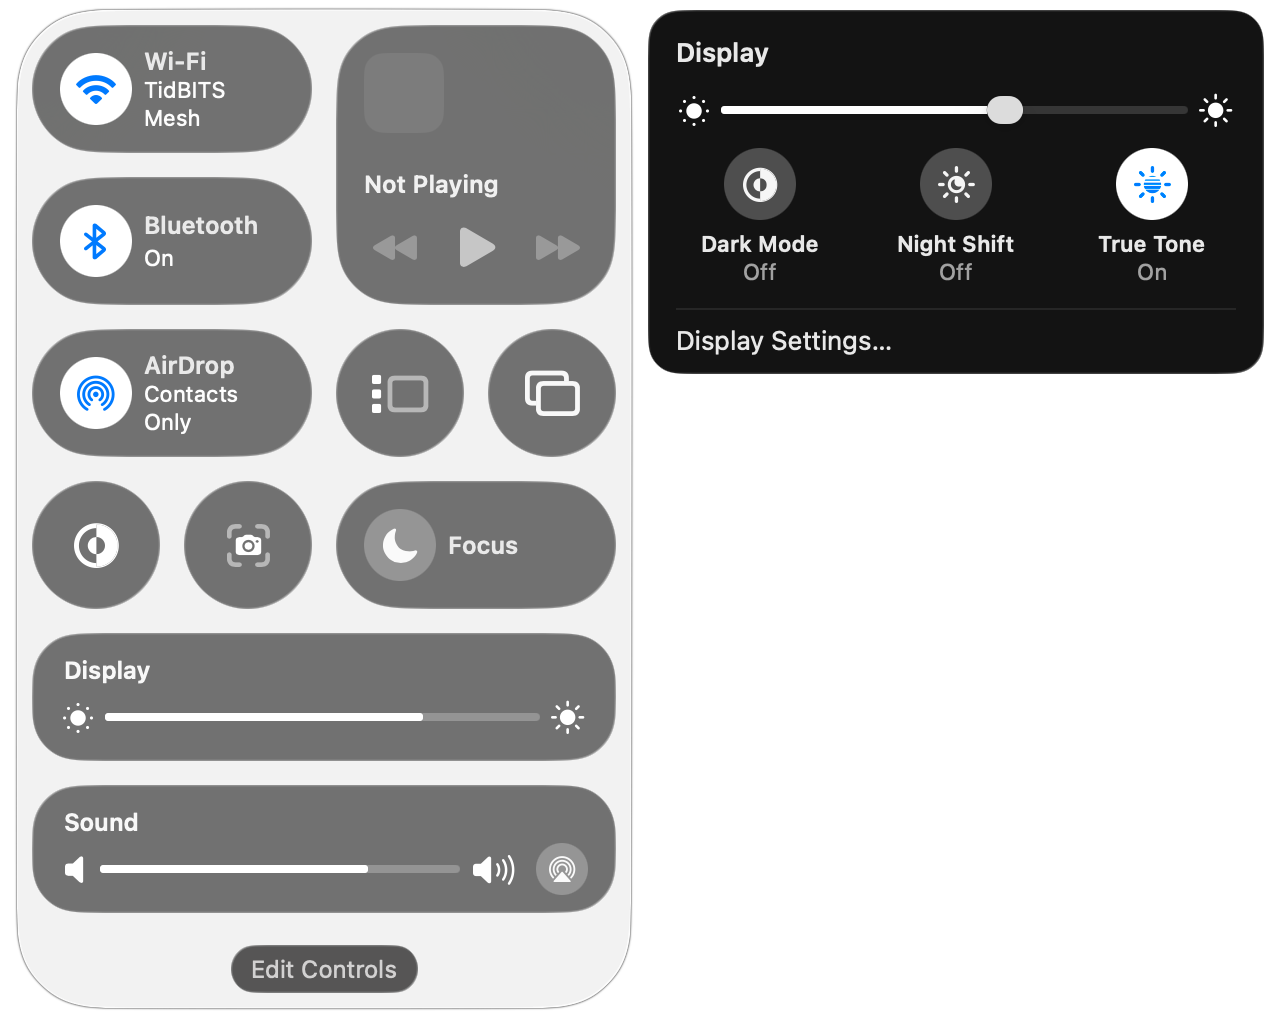
To open Control Center, click its icon  at the right side of the menu bar or use its Fn-C keyboard shortcut. It always appears in the top-right corner of the screen (below left). You may notice a colored dot next to the Control Center icon: orange means the microphone is in use, green tells you a camera is in use, purple indicates that system audio is being recorded, and an arrow means an app is using your location.
Some controls, like Dark Mode and Screenshot, are simple buttons that you click to toggle a setting or trigger an action. You’ll also see sliders, such as for Display Brightness and Sound Volume. Many controls, such as Display, open separate panels with additional controls (below right).
Customize Control Center
To begin customizing Control Center, don’t look in System Settings anymore—instead, click the Edit Controls button at the bottom of Control Center. That displays a ⊖ button on each control, adds eight empty single-button slots at the bottom, and opens the Control library.
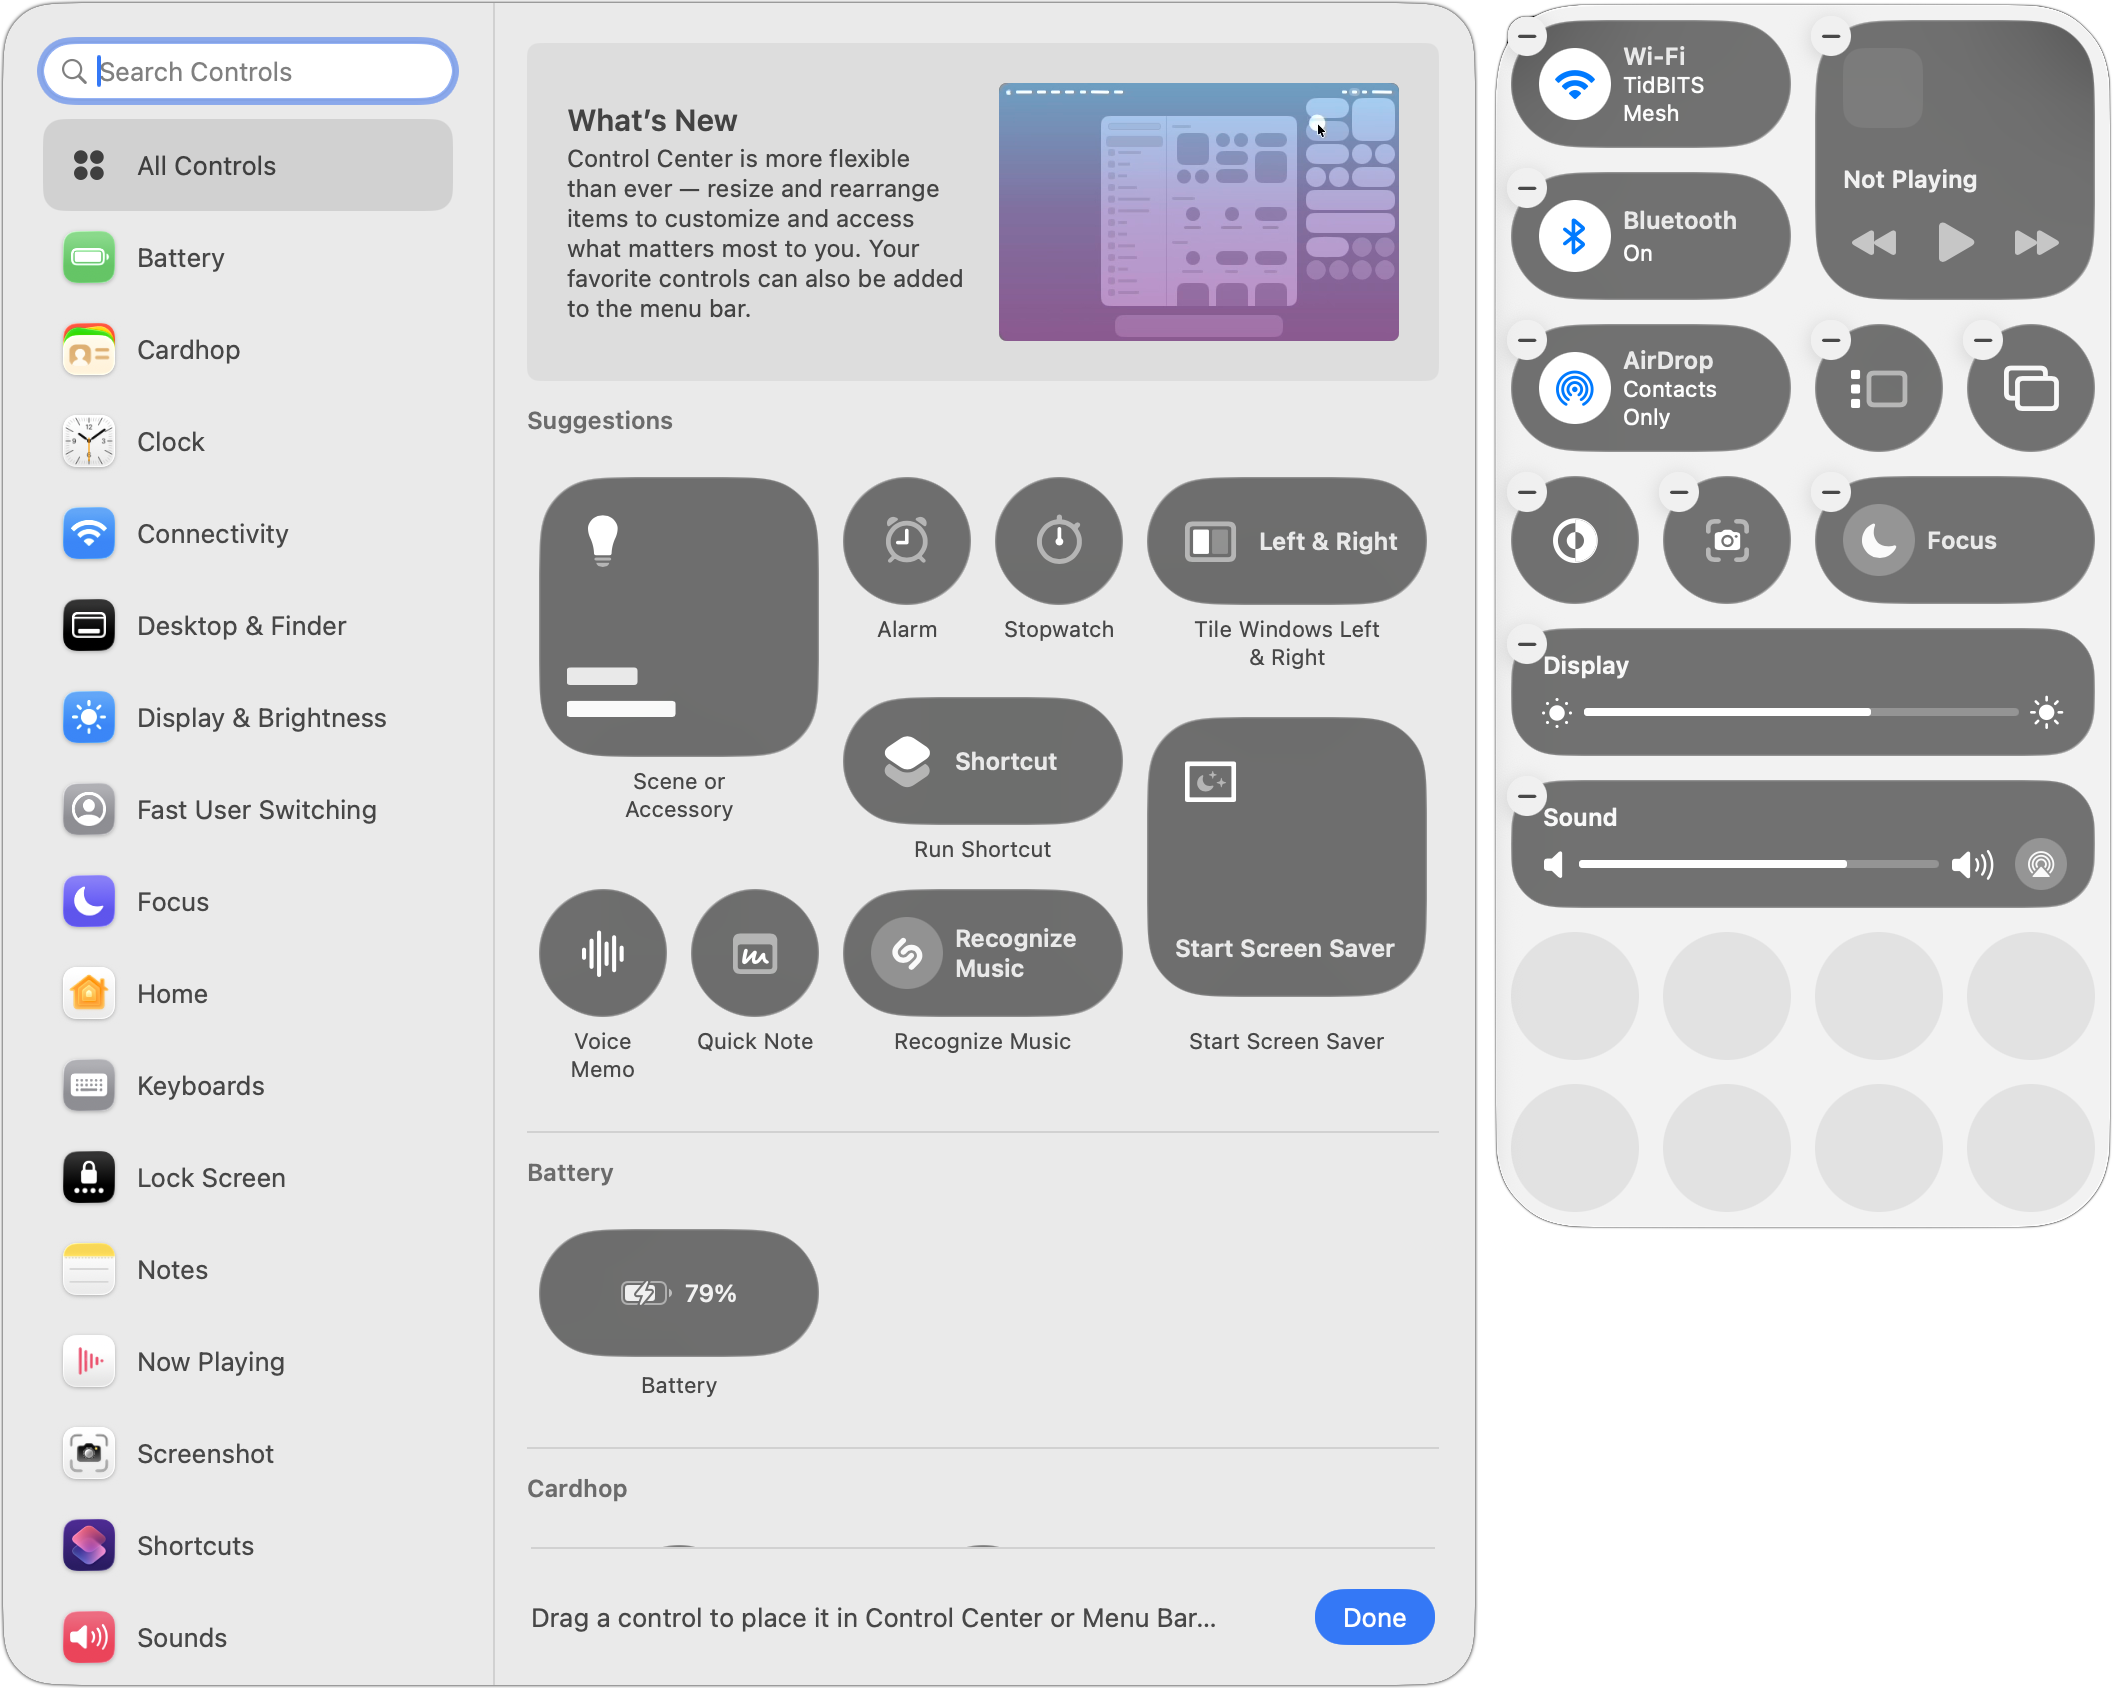
Once here, you can:
- Remove existing controls: Click a control’s ⊖ button to remove it from Control Center. You can always put it back later, although the lack of a label in Control Center can make it tricky to find in the Control library, because you may not know what you removed.
- Resize controls: You can usually resize a control by Control-clicking it and choosing Small, Medium, or Large. Small controls occupy a single slot; medium controls occupy two side-by-side slots; and large controls occupy four slots, either as a 2-by-2 grid or a 4-by-1 line.
- Rearrange the order: Drag controls in the grid to reorder them. You can move one only to a position where it’ll fit, so you may need to resize other controls to make space.
- Add new controls: More on this below, but in short, you add new controls from the Control library window that appears to the left of Control Center when you click Edit Controls.
When you’re finished customizing Control Center in these ways, click Done at the bottom of the Control library.
Adding Controls to Control Center
Apple gives you two ways to add controls from the Control library:
- Drag a control in the main pane to the desired Control Center spot.
- Hover over the desired control, click the green ⊕ button that appears, and choose Add to Control Center. You can also choose Add to Menu Bar to put the control there for even quicker access.
To discover what controls are available, either scroll through the All Controls collection or select a particular category in the sidebar. You can also search for controls by name.
Nearly all the controls have been added to the library in advance by Apple, but there are two exceptions:
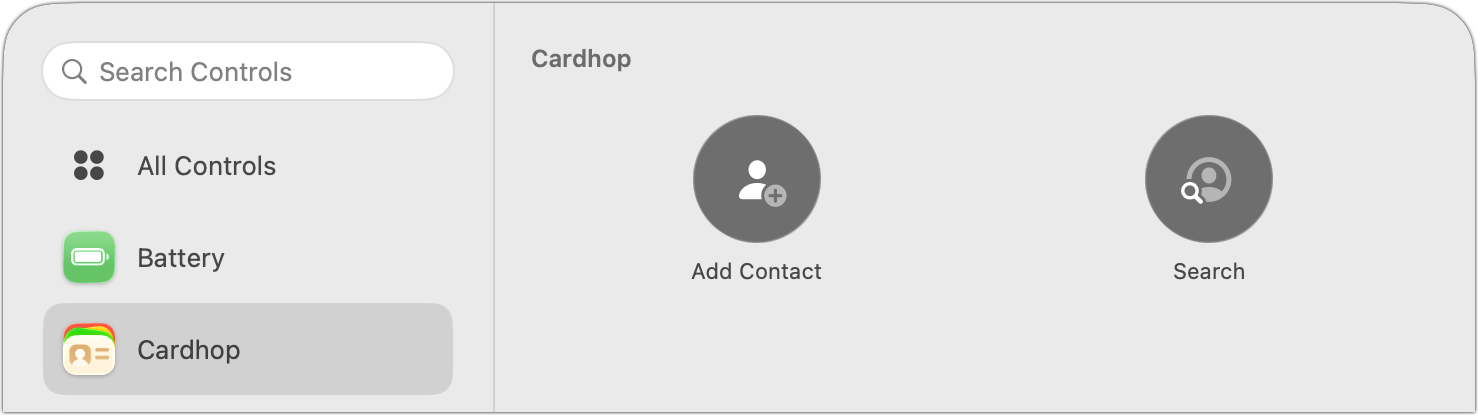
- Third-party controls: Independent developers can create their own. For instance, Flexibits’ Cardhop provides controls for adding and searching for contacts.
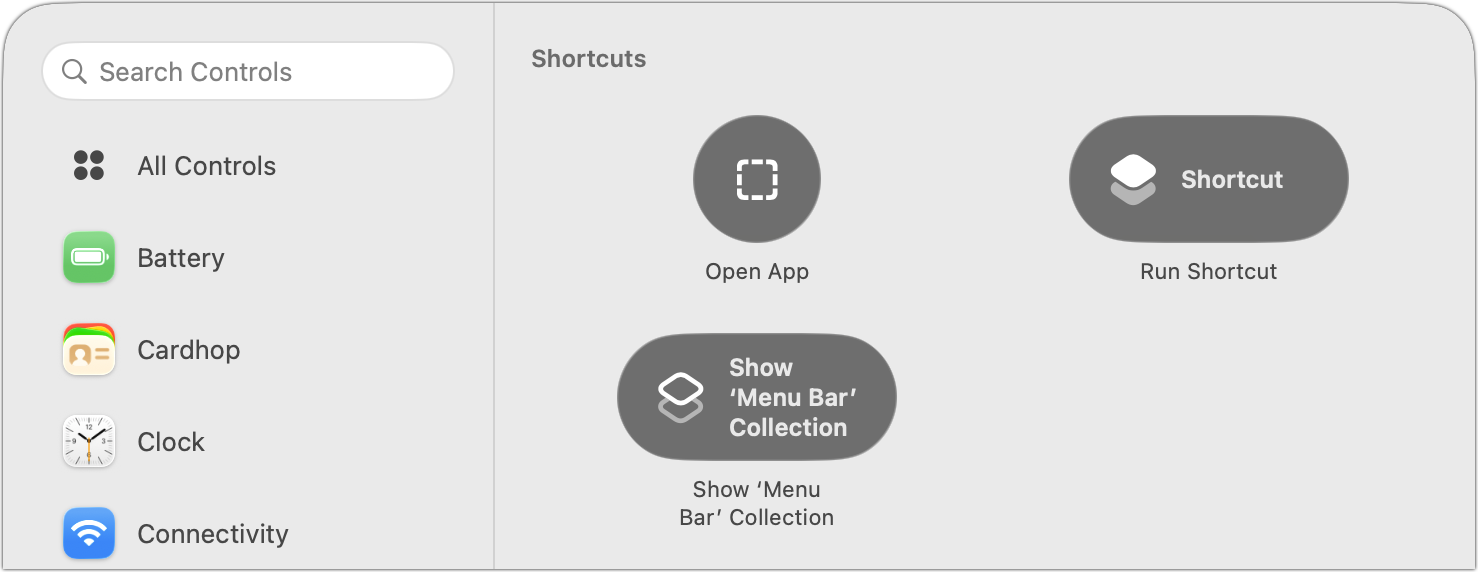
- Shortcuts: Apple’s automation app, Shortcuts, enables you to open any app from Control Center, run any shortcut, or show a collection of shortcuts. Anything you can create in Shortcuts can be triggered from Control Center. (Don’t be intimidated by Shortcuts; you can ask any AI chatbot to help you develop a shortcut.)
Don’t worry about messing up Control Center while you’re experimenting with different controls. You can always reset it in System Settings > Menu Bar by scrolling to the bottom and clicking Reset Control Center.
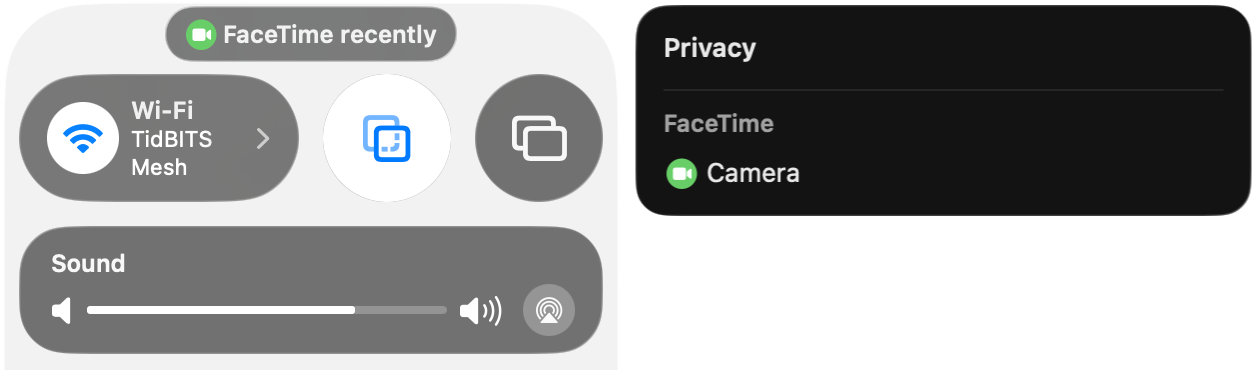
One final tip. A little control may appear at the top of Control Center at times. It’s a privacy notification that tells you whether an app has used your location recently (like Weather), used the camera (like FaceTime), recorded your screen (like Screenshot), or engaged in some other activity Apple thinks you might want to know about. Click it to learn a little more.
(Featured image based on an original by iStock.com/guteksk7)
Social Media: Stop wasting menu bar space. macOS 26 Tahoe’s revamped Control Center lets you add, remove, resize, and rearrange controls—including third-party ones—to fit your needs.

Recent Comments