
by Steve Sorbo | Jul 1, 2024 | Uncategorized
Although most Mac users rely on Apple’s Safari for Web browsing, plenty of people prefer Google Chrome for its cross-platform compatibility, massive collection of extensions, and tight integration with the Google ecosystem. Chrome is by far the most popular browser in the world, with about 65% of the market, compared to Safari’s 18%. Still others opt for alternative browsers based on the same open-source Chromium engine, such as Arc, Brave, Microsoft Edge, Opera, and Vivaldi.
Unfortunately, Chrome’s dominance makes it a target for attackers in two ways. First, attackers may attempt to find vulnerabilities that would let them steal data or compromise credentials. Second, although Google reviews extensions submitted to the Chrome Web Store, researchers have discovered malicious extensions with millions of downloads. To keep your copy of Chrome secure, we recommend two things: relaunch the browser regularly and be careful with extensions.
Relaunch Chrome to Install Updates
Google Chrome and all the other Chromium-based browsers update themselves automatically. Sort of. While the browser is running, it downloads the latest update but doesn’t install it until you quit and relaunch. Since both macOS and most apps are highly reliable, many people go weeks or even months without relaunching, leaving Chrome vulnerable to recent security exploits. You can check if you’re running the latest version or need to install an update by choosing Chrome > About Google Chrome. (Some extensions, like 1Password, even refuse to run when an update is required.)

In other words, it’s important that you quit and relaunch Chrome and any other Chromium browsers regularly—we recommend a weekly schedule to match Google’s schedule for security updates. There’s no need to worry about losing your open tabs as long as you set Chrome to “Continue where you left off” in Chrome > Settings > On Startup. All the Chromium-based browsers have a similar setting. (While we’re on the topic, remember that it’s also a good idea to restart your Mac occasionally!)

There is one exception among the alternative browsers: Arc. Its developers have figured out how to download and install updates automatically. The feature is still being rolled out to all users, but when enabled, it installs updates when the Mac wakes from sleep rather than forcing the user to quit and relaunch.
Be Careful with Chrome Extensions
Chrome extensions can be both a blessing and a curse. There are vastly more Chrome extensions than Safari extensions, so Chrome and the Chromium browsers enjoy added features that Safari lacks. On the downside, in 2023, researchers discovered dozens of malicious extensions with tens of millions of combined downloads. Google has removed all of them, but many had been on the Chrome Web Store for 6 months or more.
There are over 100,000 extensions in the Chrome Web Store, so while malicious extensions are real, most extensions are legitimate. But if Google can miss them for months or years, how can you reduce the chances of installing something evil? Here’s what we do:
- Reduce the number of extensions you install: The fewer extensions you install, the less likely one is to be malicious or cause other problems. Regularly uninstall any extensions you don’t use from Window > Extensions (the location may vary slightly in the Chromium browsers).
- Only install from the Chrome Web Store: Stick to extensions that have at least gone through Google’s reviews for the Chrome Web Store and avoid direct downloads for extensions.
- Read reviews before installing: Although reviews are no guarantee, if you see people complaining about unusual behavior, that may be a clue that the extension is doing something sketchy.
- Evaluate extension metadata: In general, avoid extensions that aren’t used by many people, that don’t have many reviews, or that aren’t updated frequently. Those aren’t guaranteed signals of a malicious extension but may be a hint to be cautious.
- Review permissions before installing: When you click the Add to Chrome button in the Chrome Web Store, a prompt explains what permissions will be granted to the extension. If they seem unnecessarily broad, cancel the installation.
Don’t stress too much about this. Maintaining good Chrome security comes down to relaunching the browser once a week and being careful about which extensions you use—it’s easy.
(Featured image based on an original by iStock.com/ArtemisDiana)
Social Media: If you use Google Chrome or another Chromium browser instead of Safari, you can stay secure by following two simple rules regarding updates and extensions.

by Steve Sorbo | Jul 1, 2024 | Uncategorized
In the early days of the Internet, when most people connected via slow modems, saving bandwidth was a big deal. You could watch images load on Web pages, and you’d have to wait to download a large email attachment before the rest of your email would appear. For most people, in most situations, bandwidth isn’t nearly as big of a deal anymore. The average Internet download speed in the US is nearly 250 megabits per second, such that most Web pages load instantly, email just appears, and we think nothing of having multiple video streams playing at once.
All that’s by way of saying that you don’t have to shrink images that you share in email or Messages in most cases, and doing so can cause problems for recipients. The most common issues people run into are images being too small or fuzzy to see, not matching the dimensions needed for a website, or being too low quality to save for posterity.
There are exceptions. Smaller or lower quality images may make sense when sending or receiving in rural areas with slow Internet connections, places with no Wi-Fi and tenuous cell service, and remote locations with only satellite Internet. In those cases, you’ll either realize that messages are taking a long time to send or hear from the other party that it’s a problem. But, most of the time, it’s best to send actual size images, so let’s look at how you ensure that.
Sending Actual Size Images in Email
How do you ensure you’re not sending downsized images in email? In Mail on Apple’s devices, the details vary slightly depending on which device you are using, but in each case, you want to use the Actual Size option. Neither Gmail nor Outlook suffers from this problem. Here’s what you need to know for each of these email clients:
- Mail on the Mac: When you drop an image into a Mail message, an Image Size menu specifies the size at which it will be sent. Small resizes the longest side to 320 pixels, Medium to 640, and Large to 1280. Actual Size sends the original image, which is what you want. The Image Size menu remembers its setting, so if you send one image in a smaller size, you probably want to reset it to Actual Size for the next one. If you attach multiple images in a single message, they’ll all be resized similarly.

- Mail on the iPad: On the iPad, when you add an image to a message, you’ll see a note in the header information that says something like “Images: 2.9 MB.” Tap anywhere in the header to reveal extra header fields, including an Image Size line with options for the different sizes. Small and Medium work as on the Mac, resizing the longest side to 320 and 640 pixels, and Actual Size sends the original, which is generally what you want. However, Large resizes the image to half the size of the original if appropriate or leaves it alone if not. Multiple images will be resized to the selected size.

- Mail on the iPhone: Because of the iPhone’s smaller screen size, Mail on the iPhone asks how to resize the image(s) after you tap the send button. The results are the same as on the iPad, described above.

- Gmail on the Web: You don’t need to do anything when sending images in Gmail to prevent them from being resized. Although Gmail lets you visibly resize an image with handles and offers Small, Best Fit, and Original options when you click, none of them change the file size or resolution of the image being sent. Only some receiving email apps (including Gmail and Outlook, but not Mail) will display the sent size. Regardless of the visible size, opening an attached image reveals that it’s the original. Note that Gmail has a 25 MB limit on attachments and may refuse to send a message with more than that or may resize images to make them fit. If you need to send an image at a particular size using Gmail, resize it before attaching—see below for a tip on how to do that.

- Outlook on the Mac: You can visibly resize images sent in Outlook on the Mac, but doing so affects only the displayed size, not the file size or resolution of the attached image. Email clients receiving an Outlook-resized image may do so at the sent size, but opening it reveals that it’s the original image. If you need to send an image at a smaller size, resize it before sending—read below for help.

Avoiding Lower-Quality Images in Messages
Although it may seem confusing, keeping images from being resized in email is pretty straightforward. Ensuring that you send full-quality images in Messages is trickier because there are multiple variables in play:
- Turn off Low Quality Image Mode: Make sure you turn off Settings > Messages > Low Quality Image Mode on the iPhone and iPad. (The Mac has no comparable setting.) This mode downsizes images sent via iMessage (blue bubble conversations), making them smaller and lower quality. Only turn it on if it’s paramount that you save bandwidth due to a slow connection or data cap.

- Avoid sending via SMS/MMS: There’s no need for Low Quality Image Mode for messages sent via SMS (green bubble conversations) because the MMS technology used to send images for SMS conversations has size limits that vary by carrier, usually between 500 KB and 3.5 MB. Messages automatically resizes and compresses images to fit within carrier limits. You have no control over this process, which is likely to be unpredictable. If you need to send someone a full-quality image, use email instead of SMS. Happily, in iOS 18, Messages will support the RCS standard that allows full-quality images.
- Prefer high-speed connections: Although Apple doesn’t document anything along these lines, some suggest that Messages may reduce image size or quality when using slow networks. If you (or your recipient) experience issues while using weak cellular connectivity, try again when connected to the Internet via high-speed Wi-Fi.
Bonus Tip: How to Resize an Image Manually
Let’s flip the problem around. Say you use Gmail or Outlook and need to send an image with specific dimensions or a smaller file size than the original. How do you do that easily? Preview! That’s right, Apple’s Preview works well for resizing images and shrinking file sizes.
To resize an image you have open in Preview, choose Tools > Adjust Size and enter the desired width or height into the appropriate field. As long as Scale Proportionally is selected, Preview will automatically set the other dimension to resize the image proportionally. You can choose other units, but pixels is generally best. Preview even reports on the resulting size at the bottom. After you click OK, save the image.

What if you want to reduce an image’s file size without changing its dimensions? With the image open in Preview, choose File > Export, choose JPEG from the Format menu, and move the Quality slider to the left to increase the JPEG compression. Preview reports on the new file size each time you move the slider. You’ll want to export a few tests to determine the best combination of file size and quality.

Generally speaking, changing an image’s dimensions is a better way to reduce file size than increasing compression.
But really, in most cases, just send the original image.
(Featured image by Adam Engst)
Social Media: It’s frustrating to receive a small or fuzzy image via email or Messages. There’s no need for it in most cases, and we explain how you can be sure you’re sending full-size images.

by Steve Sorbo | Jun 3, 2024 | Uncategorized
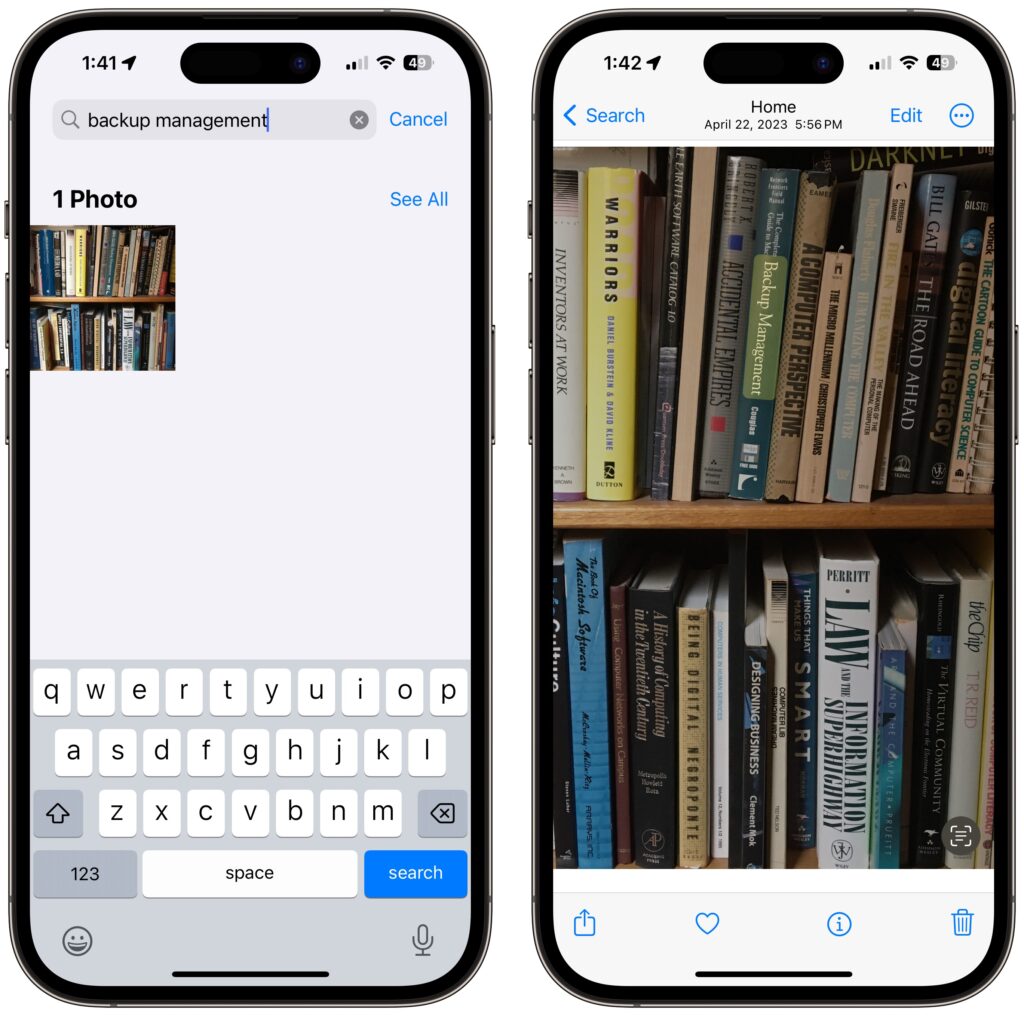
If you have trouble finding particular items across multiple shelves of books, labeled boxes, or anything else that’s clearly identified with a text name, take carefully composed photos that capture all the titles without glare. Later, you can search for any text in those photos to find them—tap the Search button in Photos on the iPhone or iPad, or use the Search field in Photos on the Mac. Photos highlights the search term on the found photo. (If Photos on the Mac doesn’t surface an expected photo, try again on your iPhone, which seems to get more hits on harder-to-read text.) This capability comes courtesy of Apple’s Live Text feature, which uses machine learning to identify text in photos. Think of it as the lazy person’s database!
(Featured image by Adam Engst)
Social Media: You can take advantage of Apple’s Live Text feature in Photos to catalog books, boxes, or any other items with text names. Think of it as a lazy person’s ad hoc database.

by Steve Sorbo | Jun 3, 2024 | Uncategorized
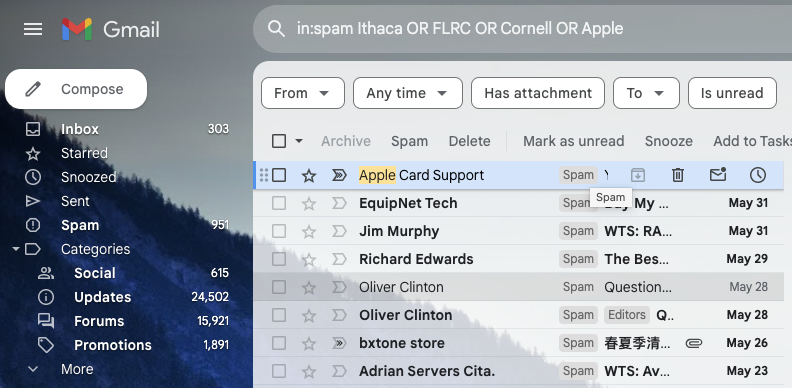
Spam filters work pretty well—99% of the messages in your spam mailbox are probably spam. But it’s frustrating to miss an important message that was caught by an overeager spam filter. Here’s an easy way to find many good messages, also known as “ham,” amidst all the spam. Think of keywords that might appear in legitimate email to you: the name of your city, major employers in your area, nearby colleges, companies whose products you use, their products, and so on. Then search for those terms inside your spam mailbox, either one at a time or, if your email app supports it, as a single search with OR statements for each keyword, like this Gmail search (use your actual town name and so forth): in:spam townName OR employerName OR clubName OR companyName. Of course, your keywords will appear in some spam messages, but if the searches reveal ham messages you would otherwise have missed, they’re worthwhile. Be extra cautious around any message that wants you to click a link, log in, or provide private information. The fact that your spam filter caught a message is a red flag.
(Featured image by iStock.com/Igor Kutyaev)
Social Media: Rather than frequently skimming your entire spam mailbox for incorrectly captured messages, try searching for specific keywords that are likely to appear in legitimate email.
by Steve Sorbo | Jun 3, 2024 | Uncategorized
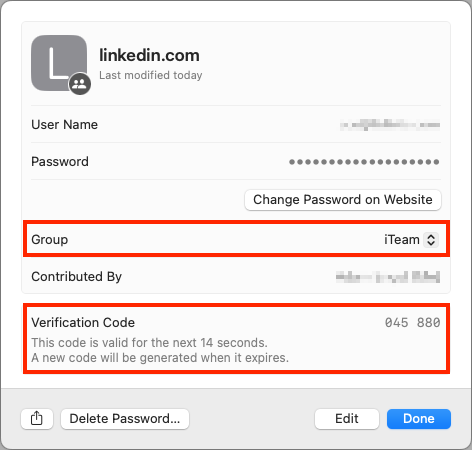
When your team or family shares access to a single account (such as for banking or social media, which seldom offer multi-user access), using two-factor authentication via SMS is awkward—whose phone receives the 2FA codes? One solution is to use an authentication app. Authentication apps are more secure, and multiple people can add 2FA support to the same account by scanning the QR code at setup or adding the 2FA setup URL later. (In both 1Password and Apple’s iCloud Keychain, edit the login to see and copy the setup URL.) An even better solution is to use a password manager that supports both 2FA codes and password sharing. That way, one person can set up the account with 2FA and add its login to a shared vault or collection. 1Password, Bitwarden, Dashlane, iCloud Keychain, and others provide such features.
(Featured image by iStock.com/May_Chanikran)
Social Media: For better results when a team or family group needs to share 2FA codes to log in to a website, try to use an authentication app instead of SMS, or better yet, use a password manager that can both generate 2FA codes and share logins with a group.

Recent Comments