
by Steve Sorbo | May 1, 2024 | Uncategorized
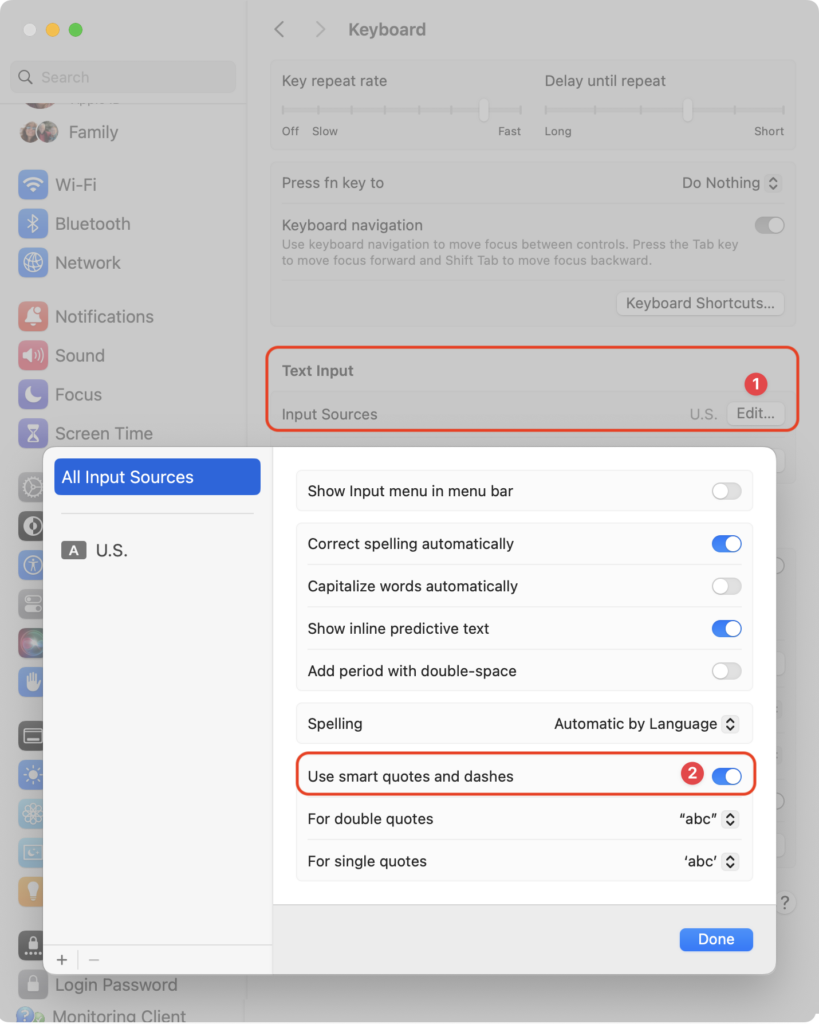
Most people like smart quotes and dashes, at least most of the time. Your Mac is probably set up to turn the single (') and double (") hash marks and double hyphens (--) that you type into the apostrophes (’) and single smart quotes (‘’), double smart quotes (“”), and em dashes (—) used in professional publications. However, in some situations, like programming, smart quotes and dashes are problematic. To prevent macOS from automatically inserting them, open System Settings > Keyboard and click the Edit button next to Input Sources. In the dialog that appears, turn off “Use smart quotes and dashes.” As a bonus tip, if you occasionally want single or double hash marks, such as to indicate feet and inches, instead of turning the entire feature off, immediately press Command-Z after typing a single or double hash mark to undo the change from straight to curly.
(Featured image by iStock.com/Wirestock)
Social Media: Smart quotes and dashes usually make your text look more professional. But if they’re problematic, you can turn off the feature that inserts them automatically or revert them on a one-off basis.

by Steve Sorbo | May 1, 2024 | Uncategorized
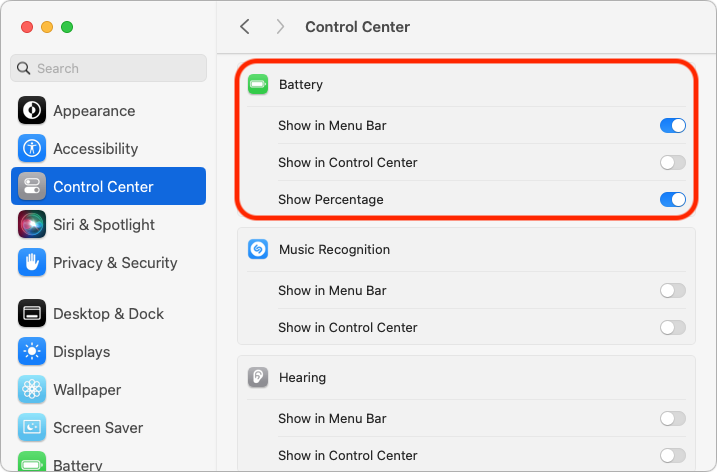
By default, the battery icon in your Mac laptop’s menu bar shows how full your battery is. Clicking it reveals the exact percentage, but you can also set macOS to display the battery percentage next to the icon. The setting isn’t where you might expect in System Settings > Battery. Instead, you’ll find it in System Settings > Control Center, where you need to turn on both “Show in Menu Bar” and “Show Percentage.”
(Featured image by Adam Engst)
Social Media: If you’re tired of trying to interpret how full your MacBook’s battery is from its menu bar icon, here’s how to get it to display a percentage as well.

by Steve Sorbo | May 1, 2024 | Uncategorized
Apple’s iCloud Keychain Password Management Is All Many People Need
We constantly recommend using a password manager like 1Password, BitWarden, or Dashlane. But many people resist committing to yet another app or paying for yet another service. Isn’t Apple’s built-in iCloud Keychain password management good enough?
The answer now is yes, thanks to two recent changes:
- In iOS 17.3, Apple added Stolen Device Protection, which leverages biometric authentication—Face ID or Touch ID—to protect users against thieves who would surreptitiously learn someone’s passcode, steal their iPhone, and then take over their digital lives. One of the worst aspects of that attack was that the iPhone passcode was sufficient to access the user’s stored passwords, so the thief could get into everything.
- Until mid-2023, Apple’s built-in password management worked only in Safari, which was problematic for users who rely on other browsers. Then Apple updated its iCloud Passwords extension for Google Chrome to work not just in Windows, but also in Mac browsers based on Google Chrome running in macOS 14 Sonoma. There’s also now an iCloud Passwords add-on for Firefox.
If you aren’t yet using a password manager, try iCloud Keychain.
Passwords Basics
Apple integrated iCloud Keychain into macOS, iOS, and iPadOS at a low level, so you mostly interact with your passwords in Safari. But first, make sure to enable iCloud Keychain so your passwords sync between your devices. On the Mac, you do that in System Settings > Your Name > iCloud > Passwords & Keychain. On an iPhone or iPad, it’s in Settings > Your Name > iCloud > Passwords and Keychain.
If you’re using a browser other than Safari, install the iCloud Passwords extension or add-on and activate it by clicking it in the toolbar and entering the verification code when prompted.

When it comes to website accounts, there are two main actions: creating a login and logging in to a site:
- Create a new login: When you need to create an account on a new website, after you enter whatever it wants for email or username, Safari creates a strong password for you. Unfortunately, the iCloud Passwords extension or add-on on the Mac can’t generate passwords—you can either create a strong password manually or switch to Safari temporarily to let it create one. When you submit your credentials, you’ll be prompted to save them.

- Autofill an existing login: The next time you want to log in to a site for which you’ve saved credentials, Safari or your other browser on the Mac displays a pop-up with logins matching the domain of the site you’re on. On the iPhone or iPad, you might get an alert at the bottom of the screen or have to pick a choice in the QuickType bar above the keyboard.

For basic usage, that’s it! However, iCloud Keychain can make mistakes. The site shown above asks for both an email address and a username and wants the email address for logging in, but iCloud Keychain remembered the username instead. Happily, Apple makes it easy to fix such unusual missteps. On the Mac, open System Settings > Passwords, or on the iPhone or iPad, open Settings > Passwords. Here’s where you find and edit your saved logins.

Open the desired login by double-clicking it on the Mac or tapping it on the iPhone or iPad, then click or tap Edit and make any desired changes.

iCloud Keychain provides additional features and options:
- A search field at the top of the Passwords window or screen helps you find logins if scanning the full list is frustrating.
- You can use commands in the + menu to create new passwords and shared groups. On the Mac, commands in the ••• menu let you import and export passwords; the iPhone and iPad use that menu to bulk-select passwords for deletion and show generated passwords.
- Shared groups let you share a subset of passwords with family or colleagues. Choosing New Shared Group triggers an assistant that walks you through naming the group, adding people from Contacts, and choosing which passwords to share. You can move passwords between groups at any time.
- The Security Recommendations screen displays logins exposed in known breaches and points out logins with weak passwords. Check those and update them as necessary.
- In Password Options, you can turn off autofill, but why would you? Another option automatically deletes verification codes you receive in Messages after it inserts them with autofill.
- On websites that support two-factor authentication, you can set up a login to autofill the verification code. During setup on the site, you’ll get a QR code you can scan with an iPhone or iPad if you’re using a Mac; if you’re using an iPhone or iPad, touch and hold the QR code and choose Add Verification Code in Passwords. Once you finish configuring the login, you’ll have to enter the six-digit verification code on the site to link it with the login.

Overall, iCloud Keychain provides the password management features that most people need, and it’s a massive security improvement over keeping a document of your passwords on your desktop.
(Featured image by iStock.com/loooby)
Social Media: Apple’s iCloud Keychain password manager keeps improving, and we now recommend it, especially for those not already using a third-party password manager. Here’s how to use iCloud Keychain to store and enter secure passwords.

by Steve Sorbo | May 1, 2024 | Uncategorized
We all make mistakes, which is why Undo exists. Immediately choose Edit > Undo or press Command-Z to undo your last change. Most Mac apps support multiple levels of Undo, so you can keep pressing Command-Z to revert change after change. However, suppose you delete a table in your Pages document, but 30 minutes and many changes later, you decide you want it back. Undo won’t help because you want to keep all the other interim changes, and Time Machine backups may not help because a backup may not have occurred at the right time.
Since OS X 10.7 Lion, Mac apps have been able to take advantage of a built-in Apple technology called versioning to save users from such situations. Apps that support versioning create a separate version of each document every time you save manually or the app auto-saves, at least once per hour. You can browse through all those versions in a Time Machine-like interface and copy data from a previous version or revert the current document to a previous state.
Some cross-platform apps, and those with a long history and legacy architecture, such as Microsoft Word, Excel, and PowerPoint, don’t support versioning, but most modern document-centric apps do. You can identify version-capable apps by the presence of a Revert To command in the File menu.
How Versioning Works
As you work, whenever a document is saved, either automatically by its app or because you chose File > Save or reflexively pressed Command-S, the previous version is added to a database of versions stored in a hidden folder on the same volume. When a file is deleted, all its versions are removed, too, so there’s no worry about wasting storage space on long-deleted files.
When you discover you need to recover some data from an older version of a file, you choose File > Revert To > Browse All Versions, which opens a Time Machine-like browser for exploring all the previous versions. On the right, you can click the arrows to scroll through previous versions, comparing them visually against the current one on the left. A few apps provide additional ways of comparing versions.

Once you’ve found the version you want, you can try copying the desired content and pasting it into the current version of your document on the left—depending on the app and type of document, you may not even have to leave the version browser.
If copying and pasting doesn’t work, you can instead click Restore to revert the document to that previous version. Unlike Time Machine, the version browser doesn’t ask if you want to overwrite the current version, so if you aren’t sure you want a wholesale reversion, press Option to change the button to Restore a Copy. That opens a separate copy of the document in the app so you can pick and choose what you want to move from the old version back into the current version.
More Versioning Details
Although versioning is easy to use, there’s quite a bit going on behind the scenes, which can generate some questions:
- What about copies of a document? Copies of a document, such as you would make using File > Duplicate, File > Save As, or in the Finder, are different files from the versioning perspective and lose access to the original file’s versions.
- Is iCloud Drive supported? iCloud Drive maintains its own version database, so although you may have to click a Load Version link to see a particular version when browsing past versions, they should all be accessible.
- Are files shared between my Macs versioned? Versions are stored at the top level of the document’s volume, so while it works with files stored on an external drive that moves between Macs, files shared between Macs over a network or using a file-sharing service like Dropbox will have different versions on each Mac, based on where the file was open when it was saved.
- Are there any privacy or security risks to versioning? The version database is completely locked down and better protected than regular documents on your Mac. Also, if you open a confidential file but close it without making any changes or saving, it won’t be added to the version database.
No one expects to make mistakes, but if you do, macOS’s versioning may save you from having to re-create work. Look for that File > Revert To menu in your favorite apps to see if they support versioning, and if they do, give it a try so you’ll know how to use it if you ever need it.
(Featured image by Adam Engst)
Social Media: If you ever regret making a change too long ago to revert using Undo, try the versioning capabilities in many macOS apps that let you view, copy data from, and revert to previous versions of a document.

by Steve Sorbo | May 1, 2024 | Uncategorized
One of the ways companies protect critical account information is by remembering the devices you use to log in as “trusted devices” or “authorized devices.” Those logins will usually have been protected by two-factor authentication or another mechanism that guarantees the device is being used by you, its owner. Subsequent logins from those devices may be more convenient for you due to requiring only a username and password, and trusted devices may automatically receive two-factor authentication codes. That’s how Apple ensures you are who you say you are when you log in to your Apple ID on a previously unseen device.
Although trusted devices can help increase your security, they can also reduce it. If an attacker were to gain access to one of your trusted devices, they would have a better chance of breaking into your accounts or masquerading as you when setting up new accounts. As a result, it’s important to audit your trusted devices occasionally and make sure you still control all of them. The first time you do this, you may be shocked to see that a Mac you last used years ago could still be receiving Apple ID verification codes. Removing unused trusted devices from an account makes it more secure with no downside.
We can’t provide a comprehensive list of services that track trusted devices, but many of you use two high-profile ones: Apple and Google. In addition, most password managers with online accounts also rely on trusted devices—we’ll look at 1Password here, but if you use another password manager, look through its settings to see if it maintains a list of trusted devices.
Remove Trusted Apple Devices
Apple gives you access to the list of all your current Apple devices in System Settings > Your Name on the Mac and in Settings > Your Name on the iPhone and iPad. (You can also log in to appleid.apple.com, click Sign-in and Security in the sidebar, and click Account Security.) Some of the devices shown may not be trusted devices—there isn’t much to worry about with a HomePod, and some old Macs may not be logged in. Click or tap any device to learn more about it—the 27-inch iMac in the screenshot below is trusted and can receive Apple ID verification codes.
Unfortunately, Apple doesn’t display the date the device was last used, which can help identify ancient devices. So look for any devices that you don’t immediately recognize as being in use—particularly Macs, iPhones, and iPads—and remove them from your account. Don’t worry about inadvertently removing a device you do use—at worst, you’ll have to log in to your Apple ID again the next time you use it.

Remove Trusted Google Devices
You can quickly load Google’s list of trusted devices by logging in to your Google account at myaccount.google.com/device-activity. To navigate there manually, go to your Google Account at myaccount.google.com, click Security in the sidebar, scroll down to find the Your Devices tile, and click Manage All Devices. Google says it keeps track of sessions (whenever you sign in) on trusted devices for only 28 days, but the sessions shown on “unknown device(s)” below are far older than that. Google helps by displaying the location and date of most sessions.
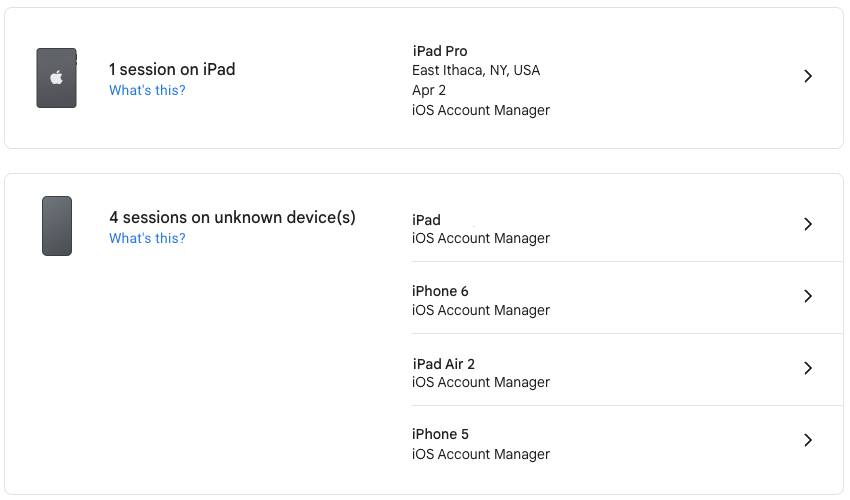
Click a session to learn more about it, including the date you first signed in on that device. For devices you no longer use, click Sign Out to remove access to your Google Account.

Remove Trusted 1Password Devices
To remove old trusted devices from 1Password, start by logging in to 1Password.com, clicking your name at the top right, and choosing My Profile—you can also navigate directly to my.1password.com/profile. As you can see, 1Password provides information about each trusted device and browser, showing its IP address, location, operating system version, and last access time.
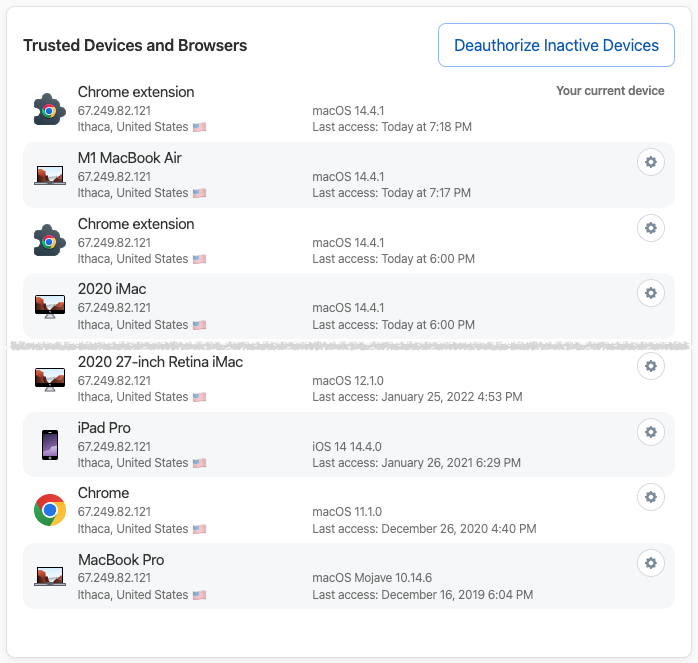
It’s easiest to click Deauthorize Inactive Devices, at which point 1Password will ask if you want to deauthorize all devices that haven’t been used in the last 60 days. If you prefer a more targeted approach, click the gear next to a device or browser you want to remove and click Deauthorize Device in the dialog that appears.

Again, the only harm that could come from deauthorizing a device you still use is that you will have to log in to 1Password again.
After you’ve audited your Apple, Google, and password-manager trusted devices—and any other accounts you may have that maintain such lists—there’s no need to check again right away. Once a month or once a quarter would be sufficient for most people.
That said, if you ever notice any unusual account activity, look at your trusted device lists to ensure you recognize everything. If there’s a device you don’t recognize or one that was used at an unfamiliar place or at a time when you were otherwise occupied, immediately remove it and change that service’s password.
(Featured image by iStock.com/Ildo Frazao)
Social Media: We all accumulate “trusted devices” in our Apple, Google, and password manager accounts, but it’s important to remove devices you no longer use because they could be security risks.

Recent Comments